Little Witch Nobeta - Any% NMG Speedrun Guide
A guide about speedrunning the game Little Witch Nobeta in the Any% NMG category written by Eveldee
Table of Content
- Table of Content
- Introduction
- Game versions
- Settings and controls
- Souls, enemies, stats, ...
- Okun Shrine
- Underground Cave
- Lava Ruins
- Dark Tunnel
- Spirit Realm
- Abyss
- Livesplit and record setup
- Credits and Links
Introduction
This guide is aimed at anyone who would be interested in trying to play in the Any% NMG (No Major Glitches) category. A lot of information in this guide can be used for other categories but the differences won't be explained here.
Important
When soul count or mana usage is mentioned, the guide assumes that the game is in Advanced difficulty. Anything that works in Advanced difficulty can also work in Standard.
I highly recommend checking out the movements and combats videos that I made that complement this guide with useful general knowledge. This guide focuses more on the route and the content of the run itself.
I would also recommend checking out the runs on speedrun.com even if they don't necessarily contain the latest techs and routes, they can still be used as a reference.
I have also done a complete Any% NMG WR Analysis that explains everything that is right and wrong with the WR in this category (as of the writing of this guide, it changed since). I will often refer to this video since it is timestamped and provides examples for most of the latest discoveries.
Note
You can click on any segment title to open the former world record run for this section. There are some mistakes made in this run but it helps with getting the general idea of a segment. It is also not the latest WR for this category but it serves as a solid base run with harder routes added on top of it.
You can find me on the Little Witch Nobeta Speedruns discord if you have any question
Game versions
You may be wondering on which version to play the game for speedrunning purposes. The answer depends on the category you are running in. The version with the least patched bugs is 1.0.3 so it is a good version for OoB categories. As for NMG, it is best to run in 1.0.5 or 1.1.0 because Thunder can hit enemies in the air reliably since 1.0.5 and a few things got changed in both 1.1.1 and 1.1.2. Other than that, the only differences between 1.0.5 and 1.1.0 is that you have access to Trial Tower and a few more skins in the 1.1.0 version.
To sum up:
- Play in
1.1.0in NMG categories - Play in
1.0.3for heavily glitched categories like OoB
This guide is written assuming that you are playing with game version 1.1.0. You can find information on how to download and use an older version of the game on the Little Witch Nobeta Speedruns discord in the #version-updates channel.
Settings and controls
First and foremost, deciding on good settings and controls is a good thing to do. For the settings, I recommend to use Toggle for Dash Type and to set the Camera Shake to 0. Make sure to also set Attack Pause to OFF as this settings can make you lose a considerable amount of time if enabled (up to multiple seconds!) because the game will pause for a brief delay for each attack. Also, there are no known differences between any language in this game, so use the one you prefer. For the camera settings, it's up to your preferences. You can find mine below.
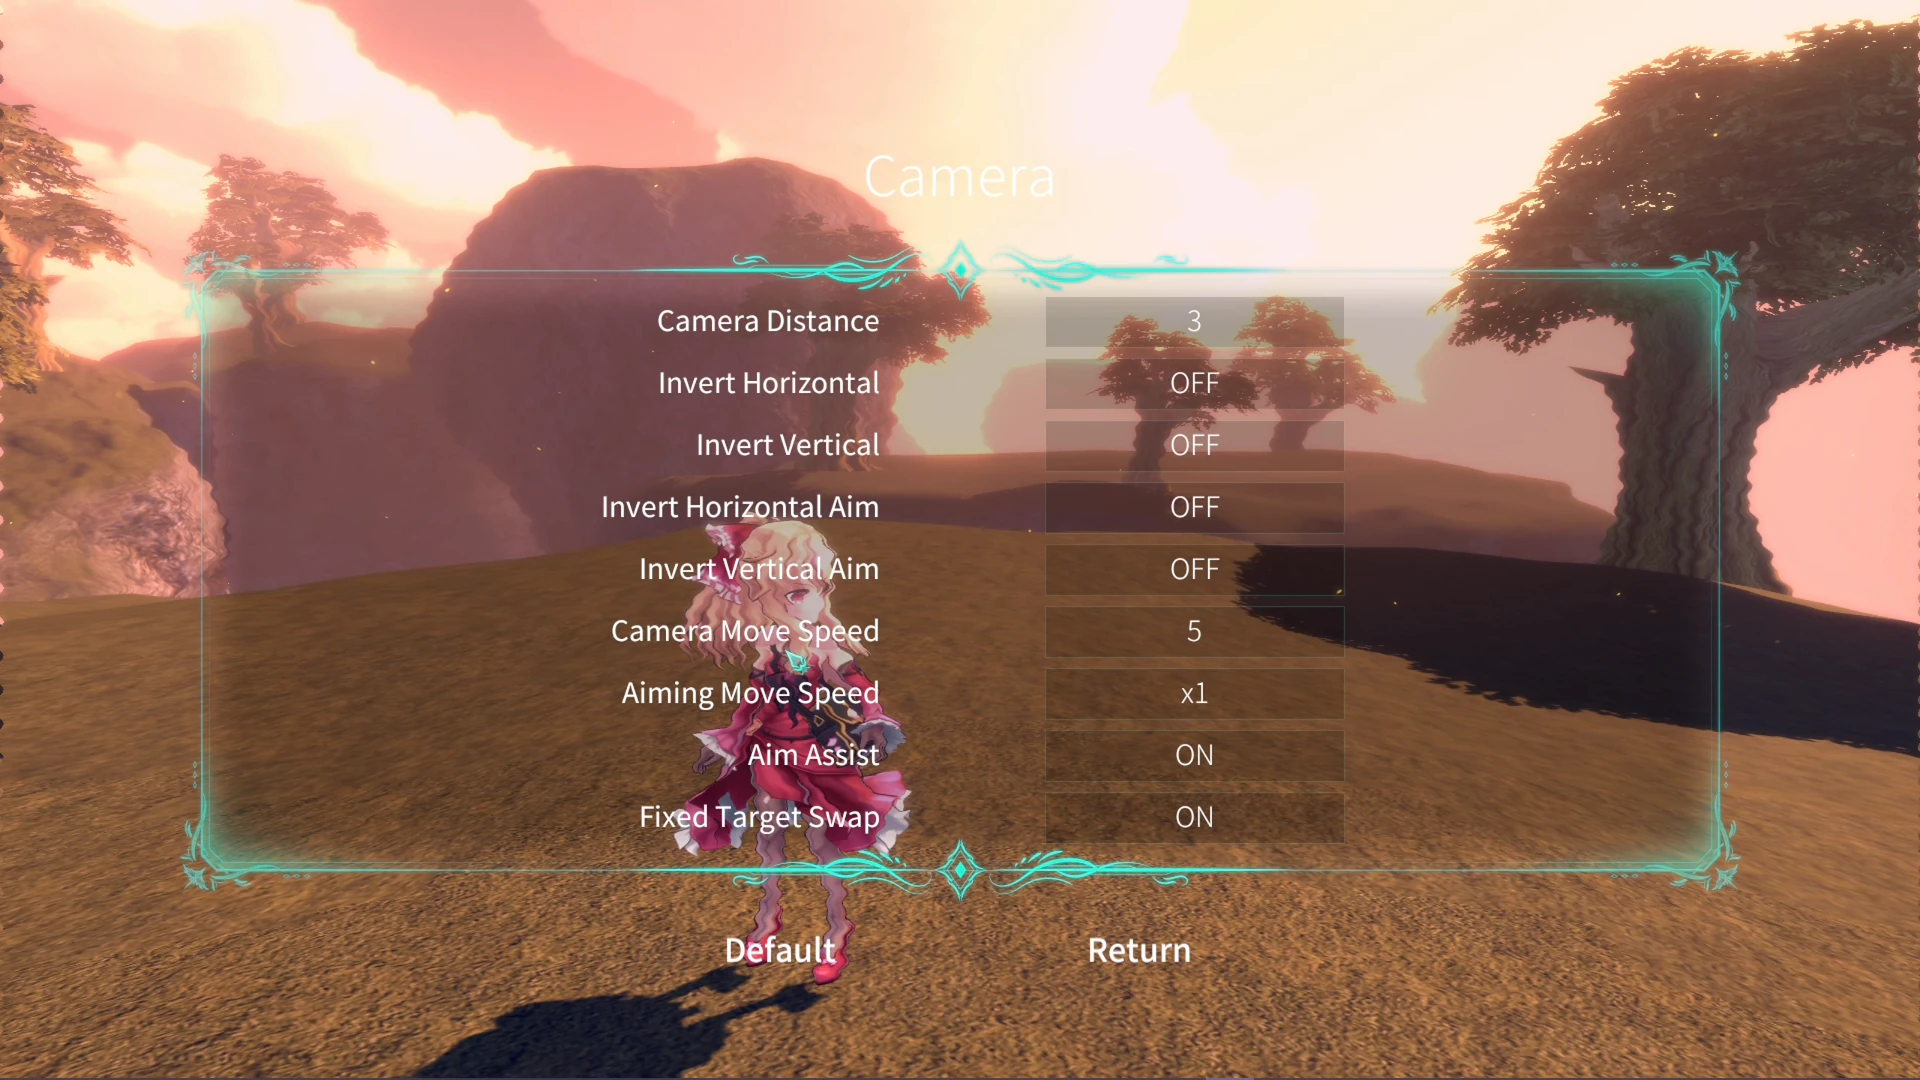
Camera settings that I use to run this game.
Choosing good controls may help you a lot, especially if you're not using a controller. Here are a few things I changed:
- Magic select using the number row (1, 2, 3, 4) and items using the function key row (F1, F2, ...). This allows me to swap magic types way faster and makes quick-swapping a breeze at the cost of having a harder time using items with the shortcuts (that's why you'll see me using the scroll wheel most of the time for items)
- Mapped Thunder magic to Tab (I use Thunder a lot and '4' is a bit far for my left hand)
- Mapped Pause Menu to Caps Lock (Similar reason. The Esc key is a bit far for my left hand)
Cursor Indicator/Crosshair
One thing that is allowed and that I find indispensable for this game is using cursor indicator (also named a crosshair). This is a visual indicator that will allow you to aim more easily, especially when not using the "aim" button. One advantage of not using the aim button is that you won't have the small random camera movements which can make you miss in some cases, especially with the high zoom of some magics like Thunder.
It is really easy to setup a cursor indicator and I would recommend anyone that have difficulties to aim to try using one. I myself use CrossOver with a custom crosshair. There are other softwares available for this, some screens even have this integrated, use whichever you prefer.
Souls, enemies, stats, ...
Before starting to talk about the run in itself, I wanted to talk a bit about all the economy around souls, enemies, and stats. In this game, you can get souls by killing enemies to upgrade your stats or get crystals at each statue. Killing as many enemies as possible, even if it makes you lose time at first, was considered a good strategy and worth in the end (to kill bosses faster thanks to having more upgrades in Intelligence for example). I myself am not an advocate of this strategy and would say you should only kill the enemies that you can kill without losing any time or only a small amount of time. For example, killing enemies while you are running or when you are recovering your stamina is perfectly fine, but I would never go back or stop completely to kill an enemy. In addition, it is not an issue to miss a few enemies. The soul requirements are quite flexible, even more so if you know how to adjust your damage and compensate in case you have lower Intelligence level than usual.
Of course, I'm not saying that getting a lot of souls isn't important, especially in the early levels. But, it is a fact that upgrading Intelligence has a diminishing return since the amount of souls required to upgrade it scales way faster than the number of souls you get from enemies. It is still something that needs a lot of investigation and testing. You may want to adjust you own route to get more or less souls. It might be worth it to skip a few upgrades at statues, especially toward the end.
That's enough introduction talk, I'm sure you just want to play and speedrun at this point, so let's get to it!
Okun Shrine
Okun Shrine is the first level of the game. It is short, but contains a lot of possible micro-optimizations.
This level starts when you confirm the difficulty setting on the new game screen. You will have two cutscenes to skip in a row which will help you to train your cutscene skip timing. A good time is having a sub 2 seconds timer after the first cutscene.
A few notes on skipping cutscenes
When using keyboard + mouse, you have the choice to either click on the confirm skip button by using the mouse or using the keyboard. Both methods are good and it will really depends on your own feeling and on the situation you are in. For cutscenes after a long loading screen or transition, I prefer to use the keyboard. For others, I use the mouse.
Be careful of trying to open the skip cutscene menu too fast! It is possible to get in a "softlock" state by opening the menu just after a cutscene starts. Seeing the normal pause menu open instead of the cutscene skip menu is an indicator that you reached this softlock state. The only way to get out easily is to die, which is not necessarily possible in all situations and may make you lose a lot of time. The only way to avoid this is to wait a bit before trying to skip cutscenes. (Note that some cutscenes can never lead to a softlock. For examples those that are triggered after X seconds like cutscenes after killing a boss)
First Barrier
After the two cutscenes, the objective is to reach the first barrier while optimizing your stamina usage (you can refer to this part of the Movements Guide video for tips on stamina management).
Firstly, go past the statue by going either a bit right or left of it depending on your preferences and then turn right. You want to do as many aerial attacks as possible while jumping off the stairs to save stamina.
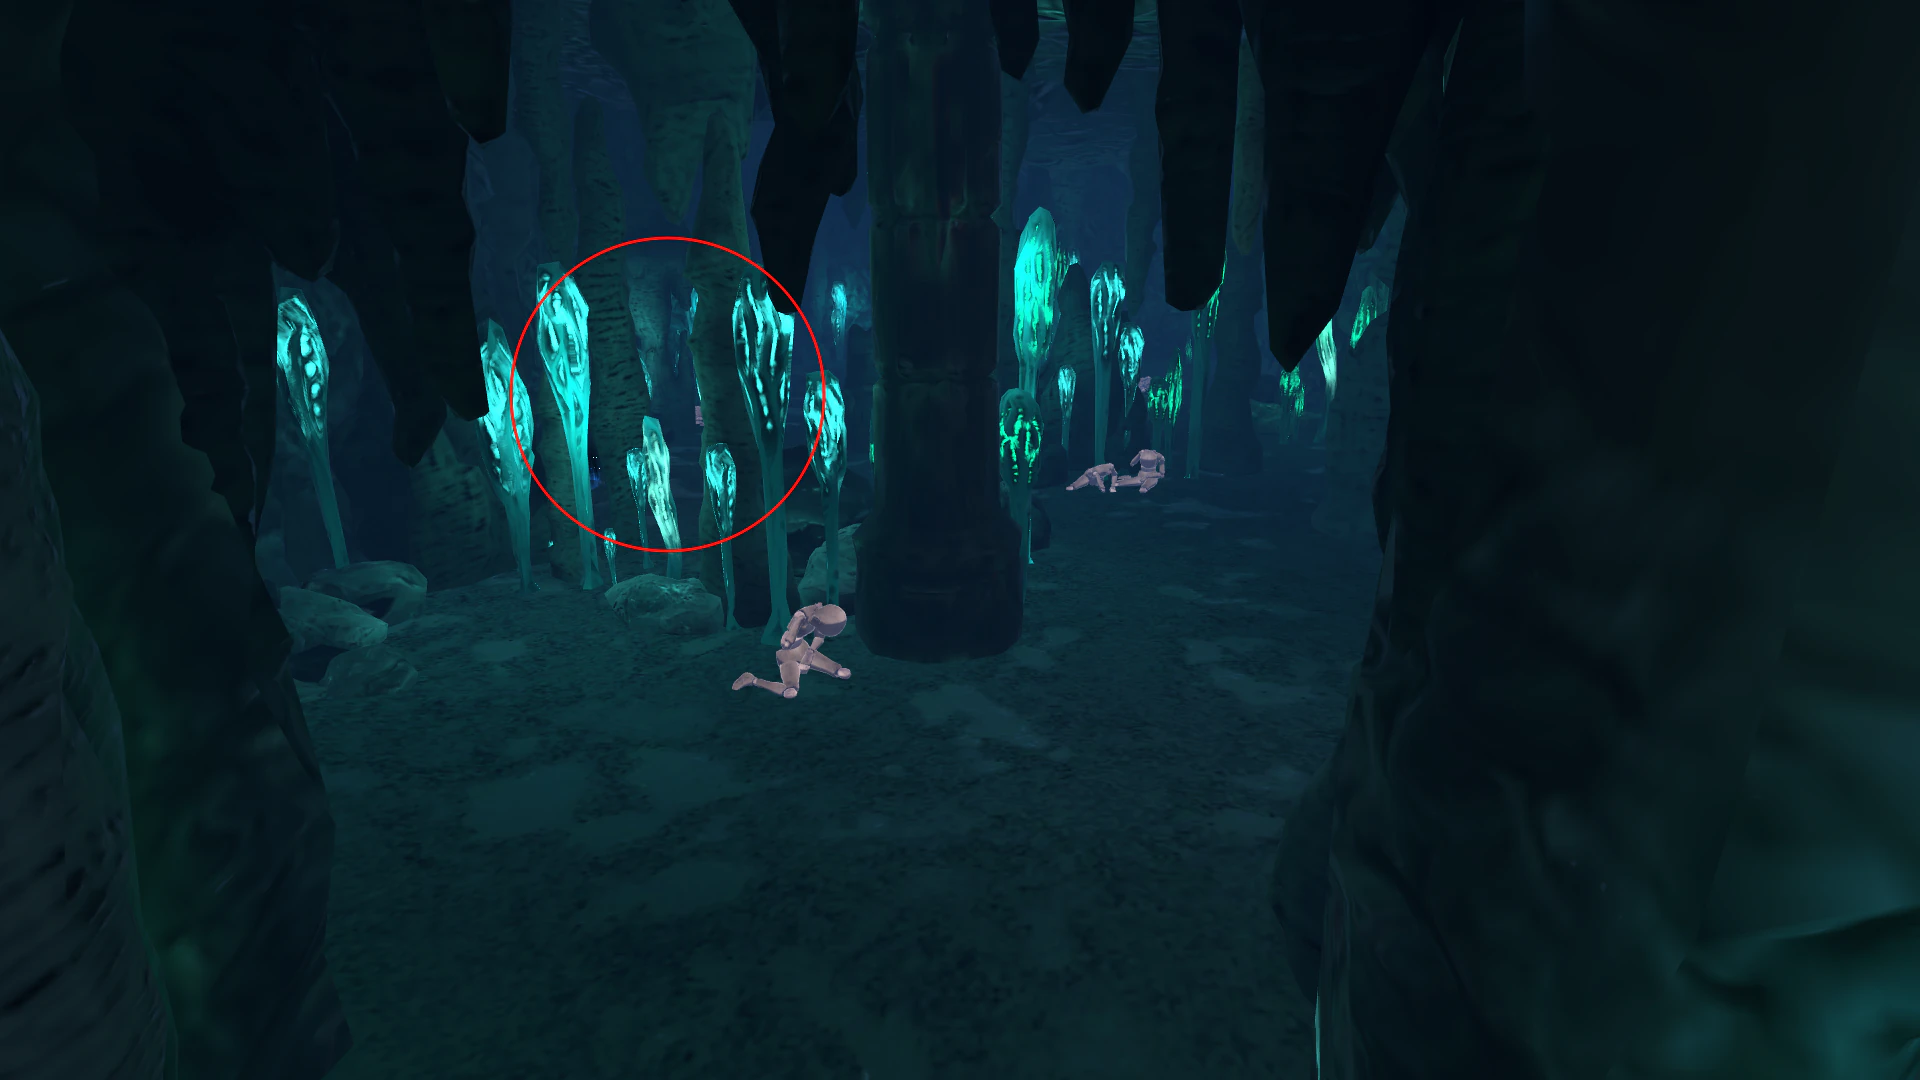
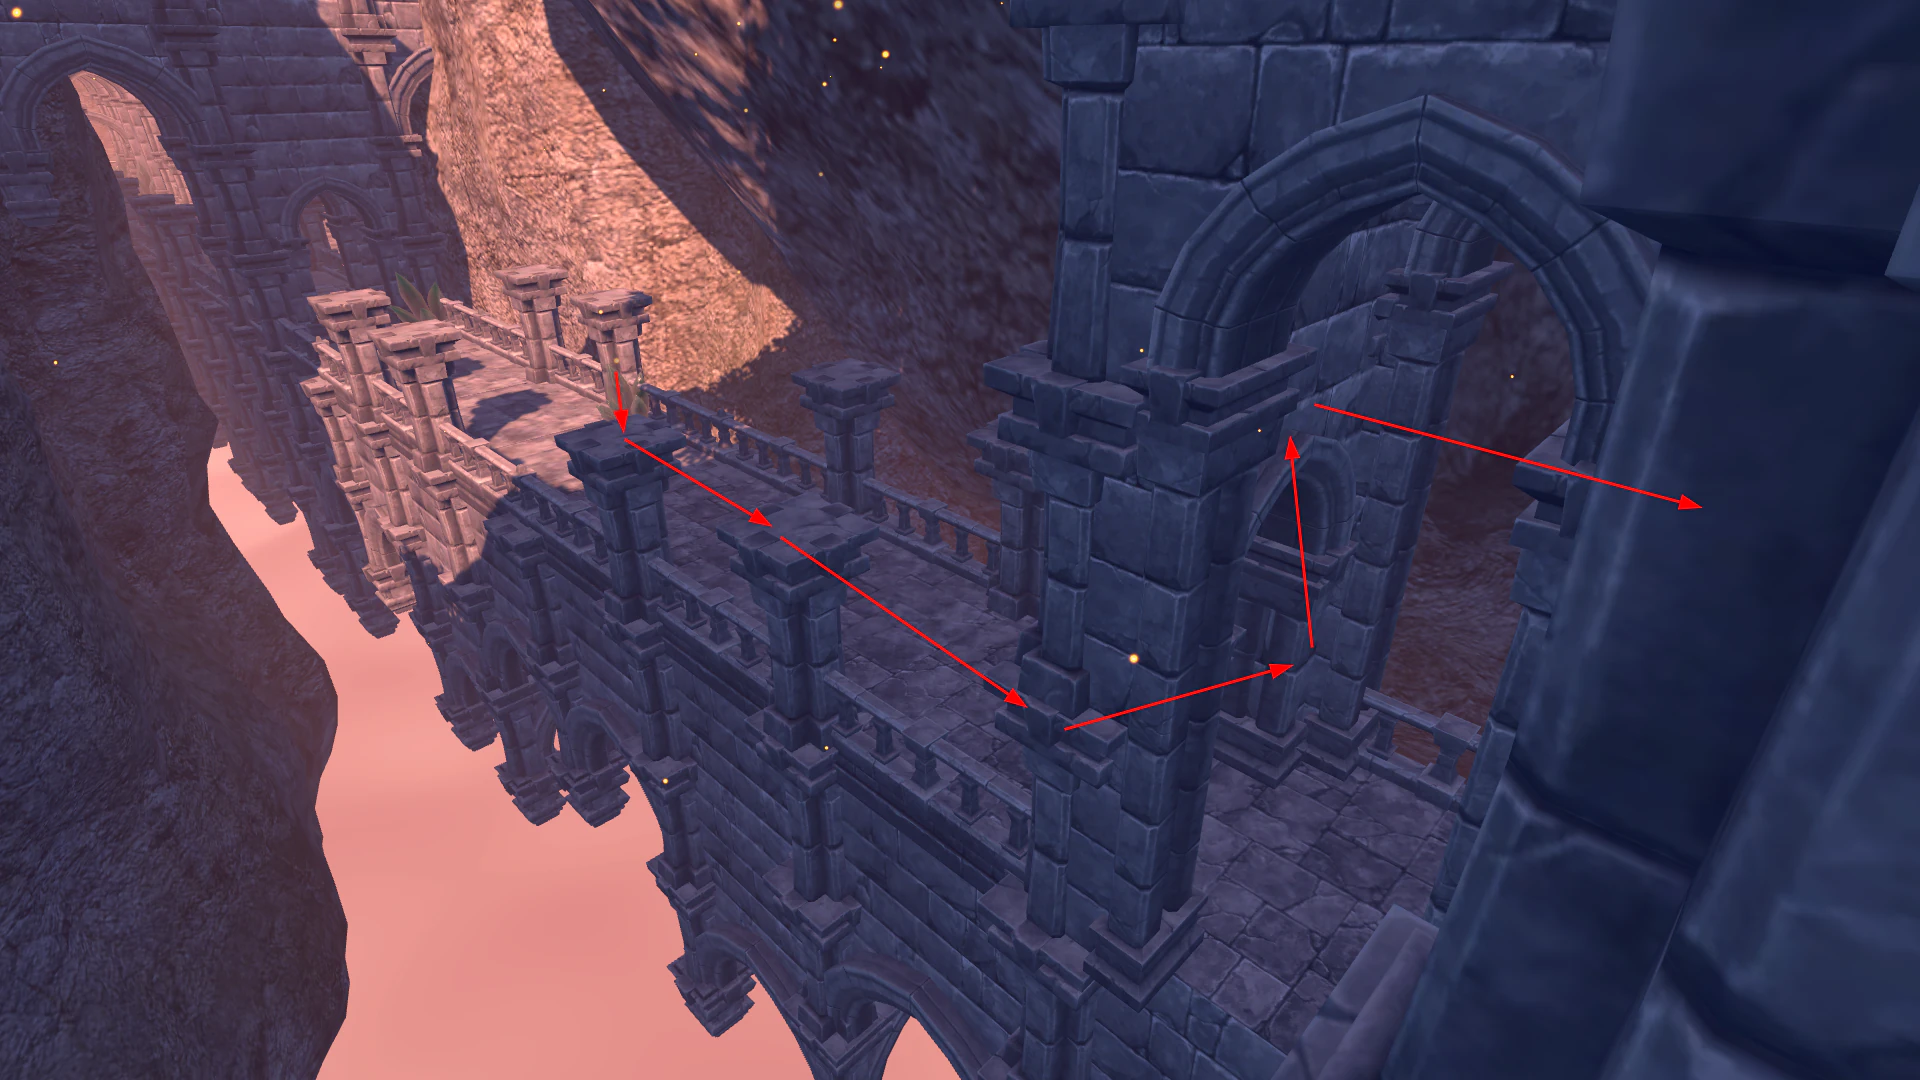
One enemy will launch a projectile at you. Either shoot at him to cancel/kill him or dodge by moving a bit to the left. Continue past him without stopping until you reach the "lightning trap trigger" (c.f. image below). You should be able to reach this point without having to recover stamina once.
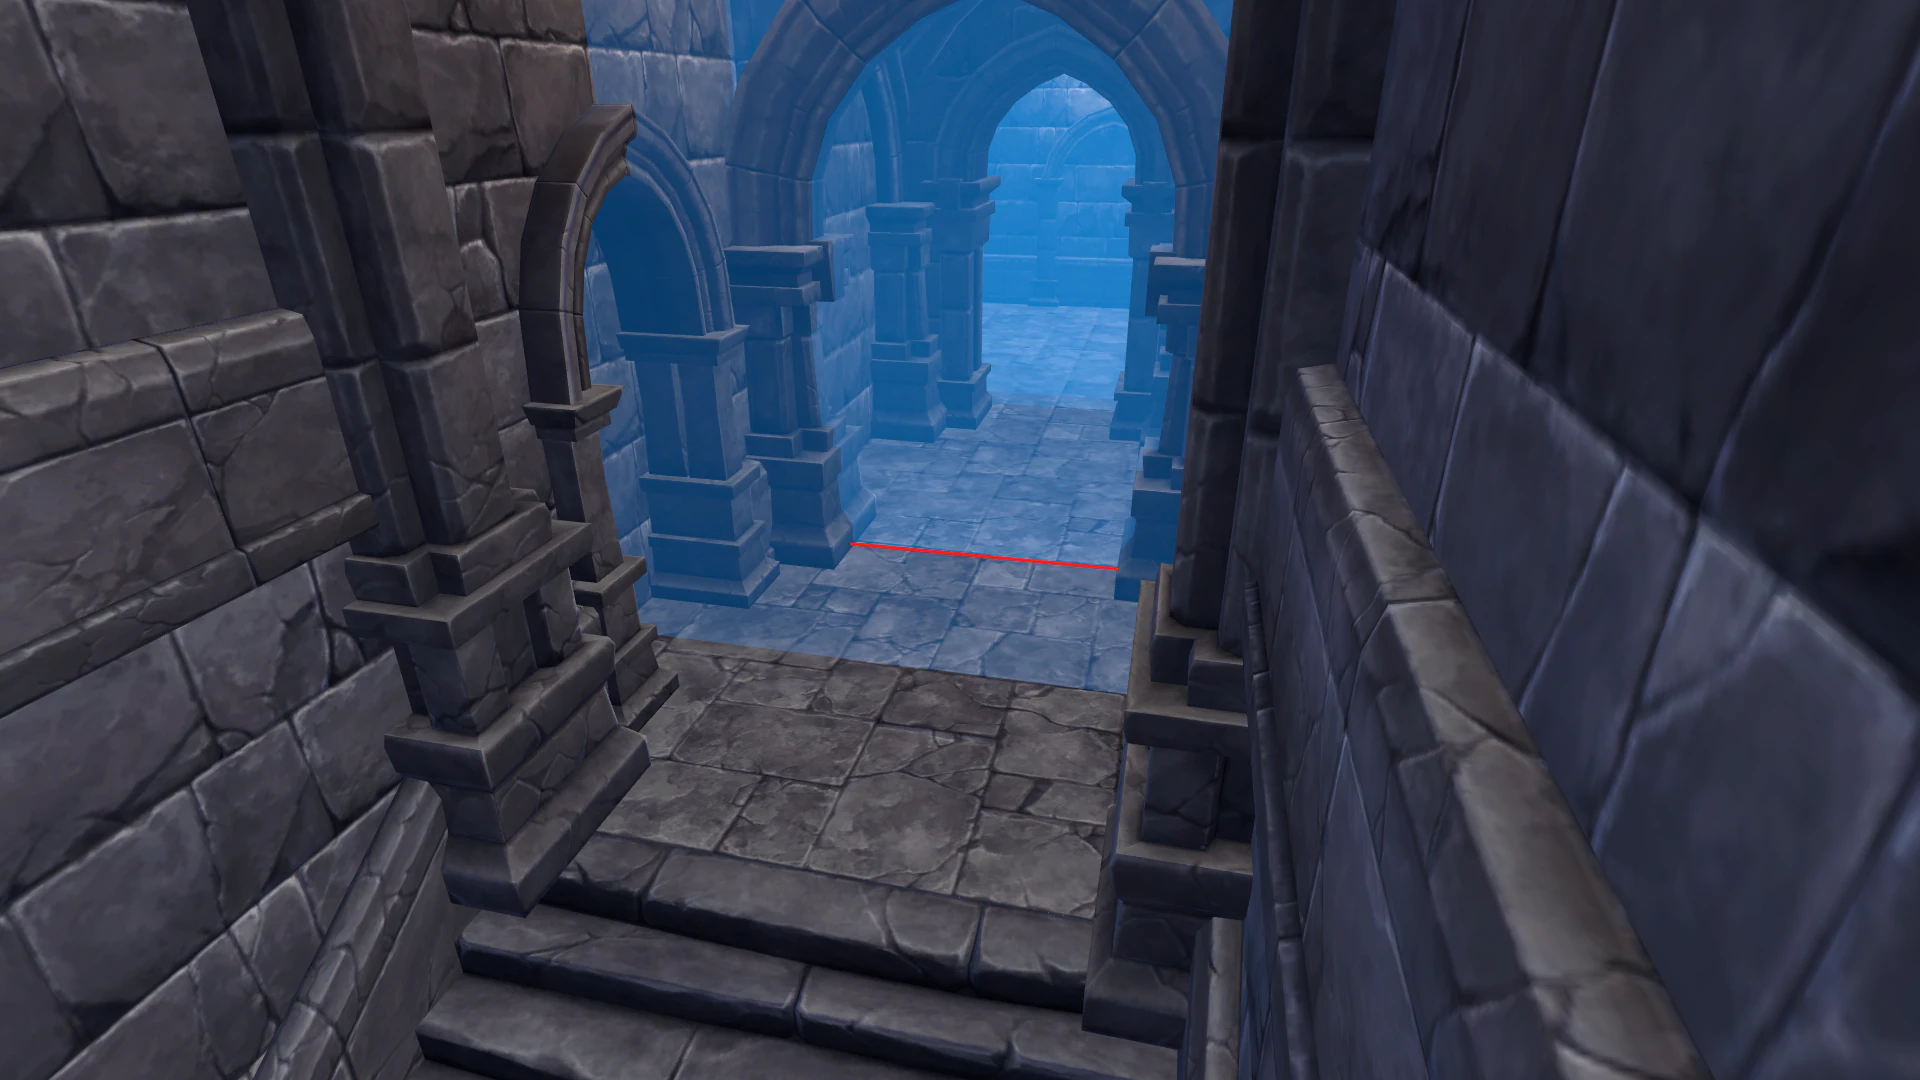
Collider to trigger the lightning trap, marked by the inner blue collider and the red line
Once you reach this point, you can stop running to recover some stamina. Continue moving forward aas you enter the next corridor. You won't get hit by the lightning traps if you're not running (which you can't do anyway since you need to regenerate stamina). Start running again when you get close to 75% stamina. You can wait a bit longer if it's easier for you.
Go to the right at end of the corridor, do the two jumps on the platforms and reach the crystal that maintains the magic barrier. The easiest way to destroy this crystal is to jump, do two aerial melee attacks, do an Arcane shot and then do a triple melee attacks combo on the ground followed by another single Arcane shot.
Note
It is required to kill at least two enemies if going for the Arcane 2 skip route to have enough souls for upgrades later on at Tania. I prefer to kill the one downstairs before the lightning trap and the one on the two platforms before the crystal. Of course, you can adapt to your preferences, just don't forget that killing the enemies near the crystal has no use because they will die when destroying the crystal!
Rescue Cat
Skip the cutscene after destroying the crystal. Now it is best to get the bag extension upgrade otherwise you won't be able to do a few things later on. To get this upgrade, jump on the crystal pedestal, jump on the stone fence, then jump extension toward the chest directly. If you find it hard to perform (which it is), you can go down the stairs and reach the platform using a simple jump extension (double aerial attack after a single jump).
Notes on jumping on crystal pedestals
It can be quite hard at first to jump onto the crystal pedestals while being in a running state. One easy way to achieve this is to do the inputs next to the pedestal in this order:
jump > wait a tiny bit > hold forward > toggle sprint. The key point is to move forward when you reach the maximum height of the jump, this way you will correctly land on the pedestal instead of jumping over it.Remember this since it will be used again later in the run.
To open the chest, the fastest way is to open it using the aerial attack that you used to reach this platform. This advanced technique is quite hard to do and not recommended at first. The other standard way is to open the chest using a normal melee attack on the ground and to cancel its animation by shooting a single arcane projectile. This is faster than waiting for the melee animation to end.
Tip
There is an even faster and more efficient way to do this that is also a bit harder to perform. You can see a clip of it here (Thanks to Muki for finding and sharing this).
After collecting the bag expansion, do not jump over the platform. This will waste stamina. Instead, let yourself fall down. Try to damage the enemy that shoots projectiles down below while going down and deal the remaining damage after landing. Ideally, you would regenerate some stamina while doing so as to not waste time.
Go toward the next statue while paying attention to one enemy that can shoot at you, either strafe on a side to dodge (you can use the sound cue to know when to sidestep) or shoot at him to cancel his attack. Go left to go downstairs and run till you reach the big blue mana crystal.
HHit the mana crystal at least once using an aerial melee attack and trigger the cutscene. Skip the cutscene.
Start charging Arcane and wait to recover a bit of stamina. Once your stamina bar stops blinking red, jump to do two aerial melee attacks on the mana crystal. Jump again to do two more melee attacks. Shoot the charged Arcane when the barrier crystal is about to spawn and land on the ground to charge another Arcane. You then need to jump to do two more aerial melee attacks on the crystal but you need to wait for your arcane magic to be charged before that, otherwise the mana orbs won't spawn. Shoot the charged Arcane while still in the air and then run directly towards the next corridor after the two melee attacks. Shoot the last charged Arcane whenever it is ready. Skip the cutscene.
Run towards the next cutscene. The colliders for cutscenes are rectangles, so run in a straight line. There is no need to reposition yourself to the middle of the corridor. Skip the cutscene.
This part can be quite tricky and the placement of the enemies is chosen randomly from a few predetermined patterns, so sometimes things don't go well. The gist of this fight is to get the aggro of the two enemies that are attacking the cat, kill the two enemies on the right using headshots, break the jars that contain mana orbs and then finish all the others using a charged Arcane. Using a cursor indicator at the center of your screen will help greatly for this part. See Cursor Indicator for more information.
Armor Start
This is the last platforming part of Okun Shrine, which leads to the first boss of the game. After the cat rescue cutscene, head upstairs while killing the enemy there (two headshots is enough to kill him). Jump on the stone fence on the left and then jump left around the pillar. If you correctly disable the running state while jumping around the pillar, Nobeta will do a "quick stamina recovery", which allows you to start regenerating stamina way faster than usual when touching the ground. Wait to have around 50% stamina (wait for more if you struggle getting to the Armor without tripping) to start running again.

Stone fence on the left which you can run on top
Run towards the big enemy with arms and then go to the right. Jump on the stone fence in front of you to go directly towards the last statue without taking the stairs. A good indicator to know where to jump to get over the fence is to jump just before the "lighter stone" on the ground (the one that has a touch of white).
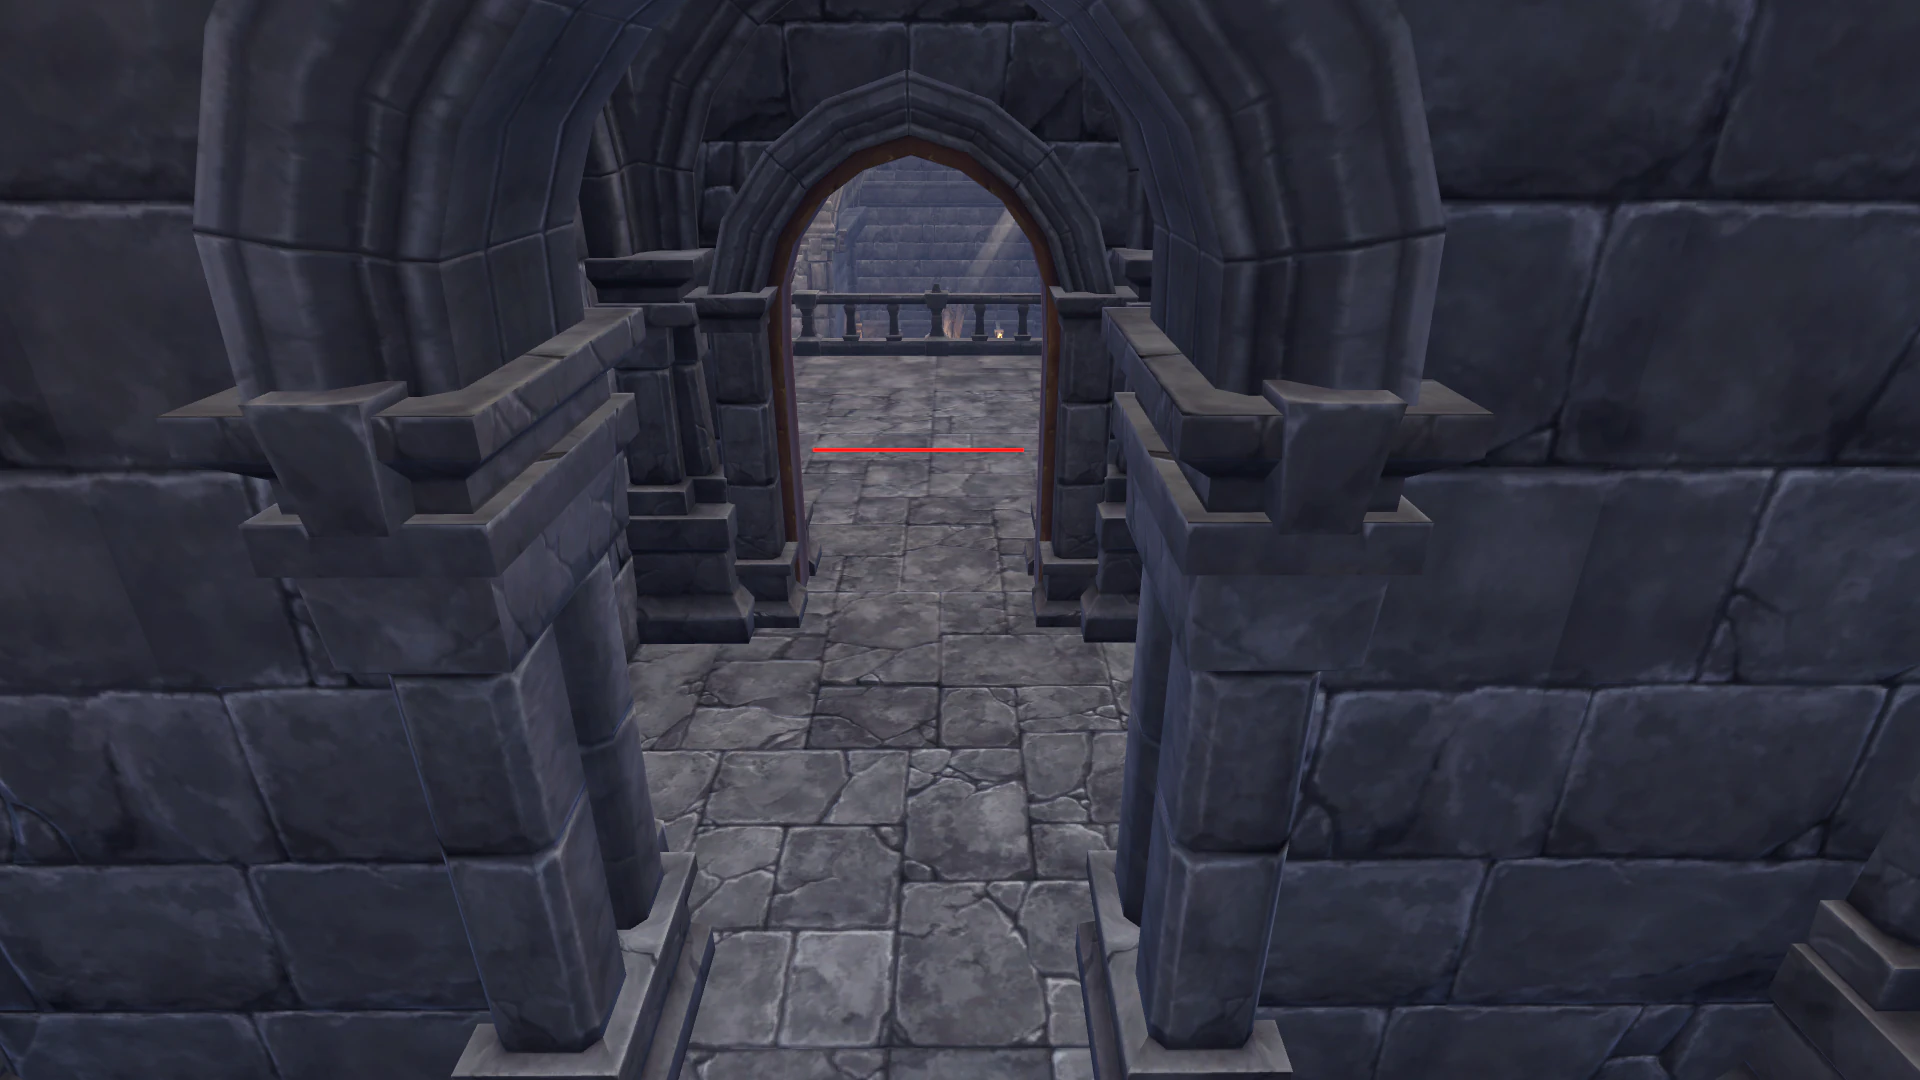
Indication line just before the light stone that represents the point at which it is recommended to jump to reach the fence properly.
Use jump extensions after jumping over the fence to save your stamina and go around the statue below. End with another jump extension down the stairs to reach the cutscene trigger, bonus point if you manage to use the trip animation to trigger the cutscene since Nobeta's velocity during the trip animation is higher than when running.
Armor
This is by far the easiest boss in the game, but the randomness of the fight may make you lose a bit of time and you can't really do anything about it. This boss has a weakpoint that you will need to aim at: the base of his body (the purple flame). It is also easy to stagger this boss using charged Arcane shots, so that's a reliable way to kill him easily without any specific strategy.
The fastest strategy is:
- Shoot the left jar on the left wall and charge Arcane. Pray for Armor to do an attack that will allow you to easily hit his weakpoint (best one is the charged slash).
- Shoot the charged Arcane at his weakpoint and immediately destroy the left jar on the right wall.
- Profit from the fact that he's staggered to shoot a few non-charged Arcane shots at his weakpoint (6 shots is ideal).
- Start charging immediately and do a triple melee attack combo
- Shoot the charged Arcane whenever possible while aiming at the jar behind the boss on the right (the charged Arcane projectile will go through the boss and break the jar if aimed correctly)
- Shoot twice with non-charged Arcane shots (you can sometimes shoot a third time here but, if you're too slow, the boss will enter in a defensive state which you don't want to happen)
- Start charging Arcane and do three melee attacks
- Shoot the last charged Arcane as soon as possible
- Finish the boss using non-charged Arcane magic if he's low, otherwise charge another Arcane
Note
For this strategy to work, you need to hit the correct jars since for each group of jar, one of them gives more mana than the other. Always break the one with the most mana (or even both).
For some reason the Armor sometimes waits 2-3 seconds before starting any attack pattern, that's why the linked split is +3.1 sec from best split, although it is nearly perfect.
Congratulations, you already completed one of the six levels of the game!
Underground Cave
This is the second level of the game. The objective in this level is to get the Wind, Arcane (can be skipped) and Ice magic books before proceeding to the boss. There is still no fast way to kill enemies and they don't give a lot of souls, so killing them is not a priority.
Important
The route in Underground Cave and Lava Ruins are a bit different if you go for the Arcane 2 skip. It saves a lot of time in total, but it is also way harder than the regular route. I will write the original route and add notes whenever something is for the Arcane 2 skip route.
Ice Magic
This level starts with a cutscene just after the loading screen. Skip it. Turn around after skipping the cutscene and head to the chest containing Wind magic. Open it and pick up the book. Same as the first chest, you can either use an aerial attack or a cancelled melee attack on the ground to open the chest. Use the one you're most used to. The timesave is negligible.
Since we run in Load Removed Time, the timer pauses during loading screens. This is why the best thing to do after getting Wind magic is to open the pause menu and Return to Statue (you can open the menu the exact moment you see the message appear on the top right corner of the screen when picking up the magic book). This way you will be back to the start of the level directly instead of having to run back.
After the loading screen, start running directly without waiting for the screen to fade out (yes, it is possible to move while the black fade out animation is still going, try to "feel" the right moment to start running, it's possible to do that after most of the loading screens). Double jump over the obstacle and then follow the path. Do not talk to the cat as of now. We'll pick up the absorption magic book later in the level. Continue on the left until you reach a wider cave. Instead of going right, jump over the stone pillars on the left (c.f. image below) and run until you are next to the falling rocks. Do not go too far or else you will be damaged by the falling rocks and fall back. Destroy the newly appeared wall by shooting Arcane magic at it, wait a bit to recover some stamina (~80%), and then go up the stairs. Once up the stairs, pass by the big enemy and jump over the small pit, then follow the path until the next big cave.
Tip
It is possible to "buffer" the sprint state after cutscenes and level loadings by holding the sprint key event when playing with the "toggle" sprint mode. If doing that and using toggle mode, the best is to release it during a jump because it will otherwise slows down Nobeta.
Shortcut to the falling rocks by jumping over the small obstacle on the left
Tip
Muki found a faster way than going up the stairs after destroying the rock wall by climbing on the right side. You can find a video of it there
Just after the last wooden platform, go to the left and do a double jump extension jump > double aerial melee attack > jump > double aerial melee attack > stop sprint to reach the chest for Arcane magic. If you are low on stamina at the wooden platform, stop running and wait to recover a bit to avoid falling down before the jump (would be quite unfortunate). Destroy the two dolls to get a few souls, open the chest, pick up the Arcane magic book and either go around left or right while recovering stamina (~80%). This part can be quite tricky and going left or right is equivalent in difficulty. The goal is to fall down and pick up the Ice magic book in the chest, but, there are a lot of enemies that can hit you while you're picking the book, cancelling the pickup animation. The two enemies on the ledge above can shoot projectiles at you and are the more likely to cancel you. They will first lock onto you when you are falling down and then wait a bit before shooting. This means that there are two possibilities: either pickup the book before they shoot at you, or wait, dodge both projectiles and then pickup the book. Find your own timing by training it multiple times and stick with it. Consistency is key for this segment.
Important
Arcane 2 skip: If you are going for the Arcane 2 skip route, you can jump down directly to the Ice magic chest but make sure to break the doll near the Arcane magic chest to get some souls for upgrades later. A video shows it better than any word could: check the example there.
One downside of this route is that it is not easy at all to reach Ice magic using this route without getting hit by the enemies. A lot of different paths work. The one I use may not be easy to do if you don't have high camera sensibility to do the 180 and forget to redirect while in the air. Try to find one that works best for you.
Tania Start
Once you have Ice magic, turn around and follow the path on the right then follow the path that goes up. Ignore the enemies on the way. Remember to equip Ice magic at some point before reaching the top of the path. When reaching the top, check if you still have enough stamina and do another double jump extension on the left to reach the next two enemies. Kill them with headshots with Ice magic while walking to recover your stamina. After killing them and with enough stamina (~50%), follow the path until the blue light on the right (c.f. image below), at which point you need to stop running to charge Ice magic.
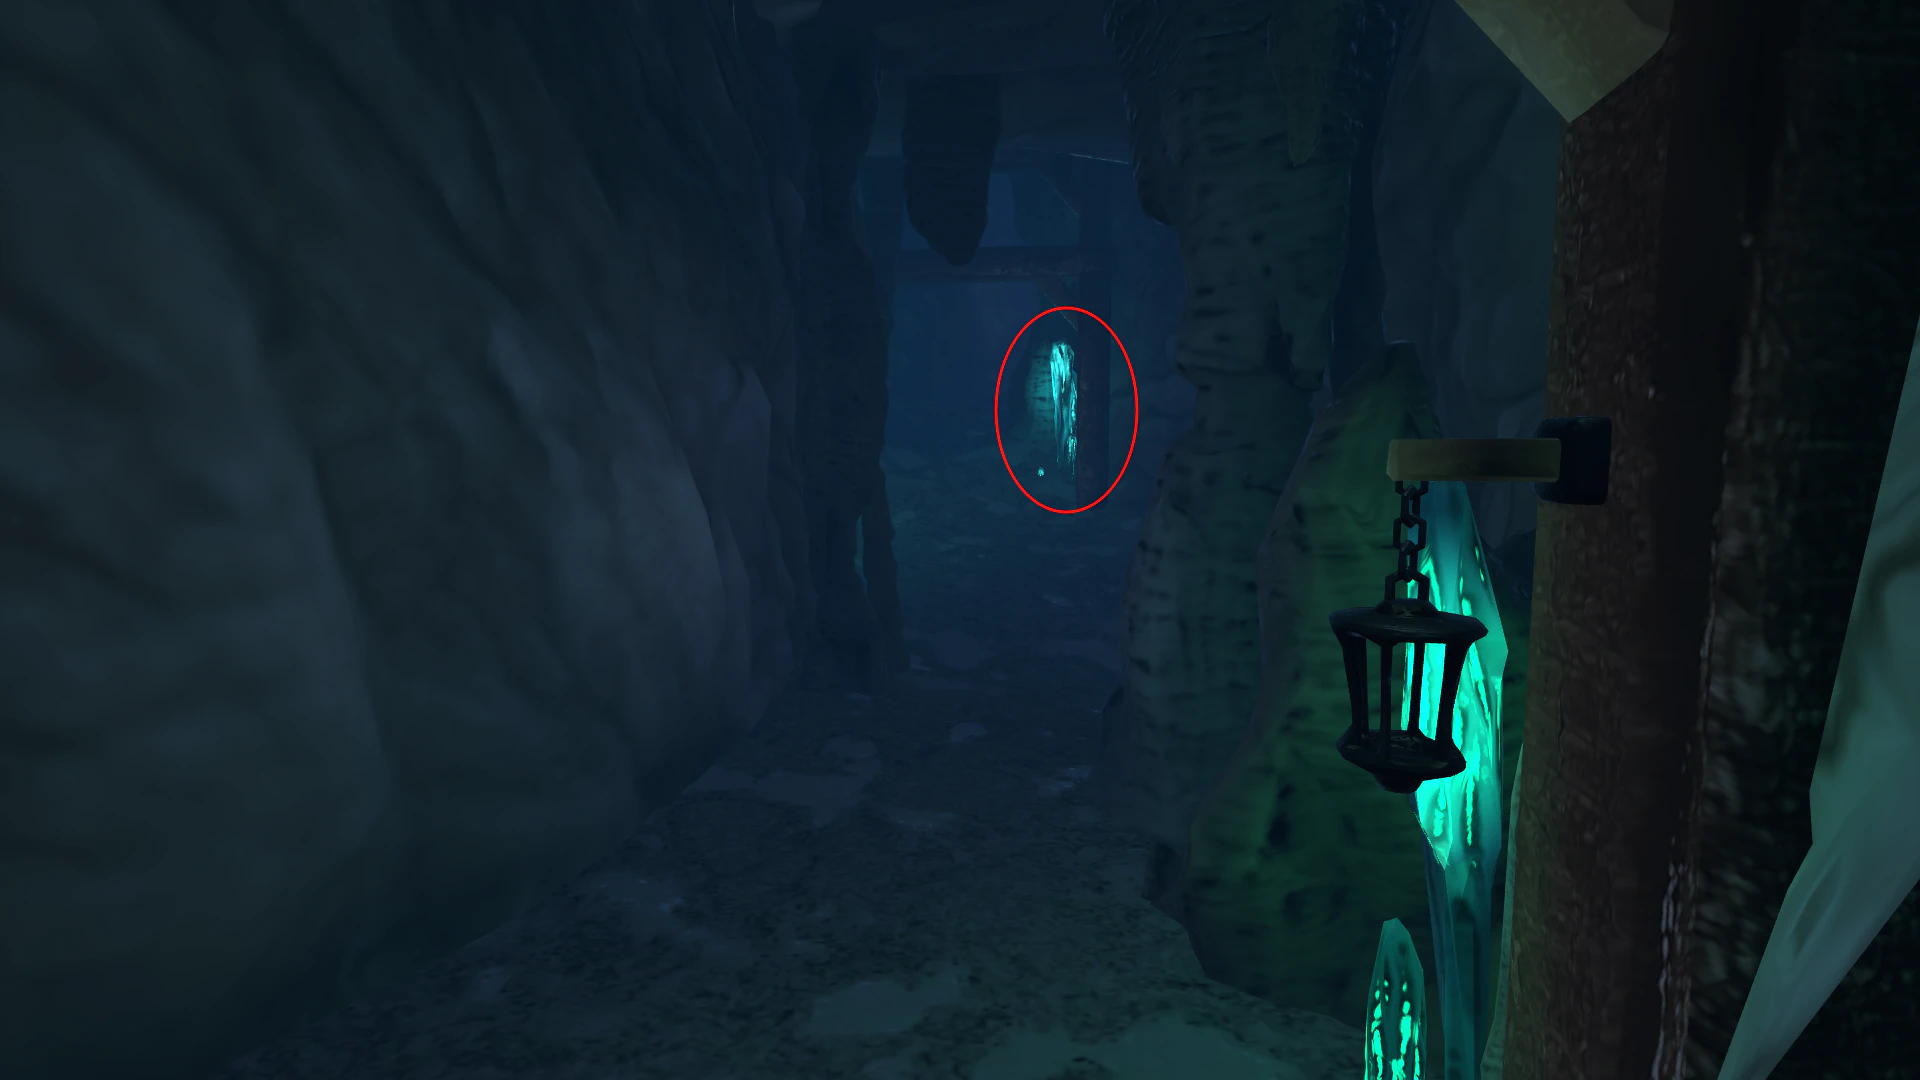
Blue light that indicates the point at which Ice needs to be charged
You can start running again when you reach around 50% stamina. Lock onto the two stone crystals on the right and on the left while still running towards the barrier. As you reach the stairs, cast your charged Ice magic (this will disable the running state). Start running again and shoot at the third stone crystal directly using non-charged Ice attacks (you can hold the shoot button). Try to end up where the absorption book will spawn (c.f. image below) before the cutscene starts.
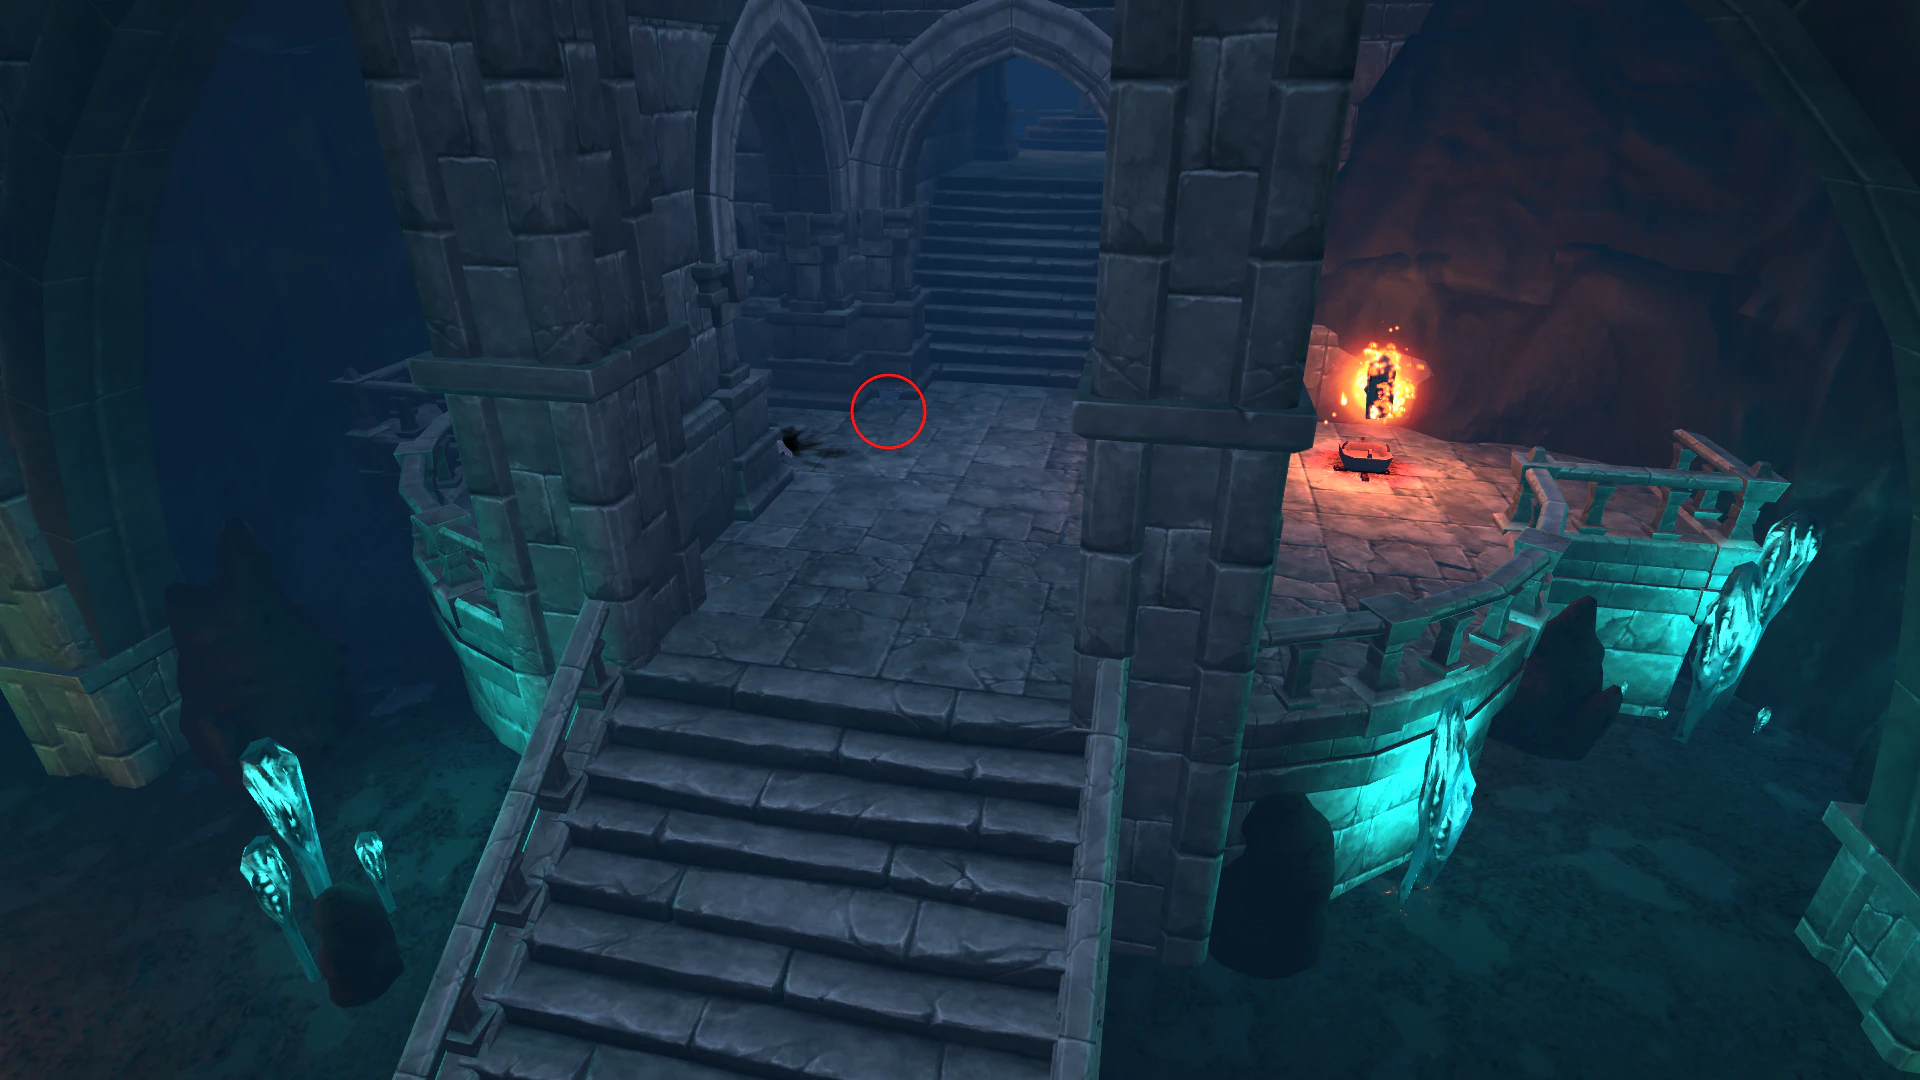
Absorption book spawn position
Skip the cutscene. After the cutscene, wait for the cat to move before trying to pick up the book (to avoid talking to him). Dodge toward the stairs to avoid a potential attack and then start charging Ice magic. Continue running up the stairs towards the statue while Ice magic is charging. Pray to the statue once you reach it and Ice magic is charged. It is required to charge Ice magic here as it prevents you from being staggered/knocked down while praying to the statue. Go into the Enhance Abilities menu and upgrade Intelligence to level 6. Use the pause menu button to directly leave the statue without having to press Return twice.
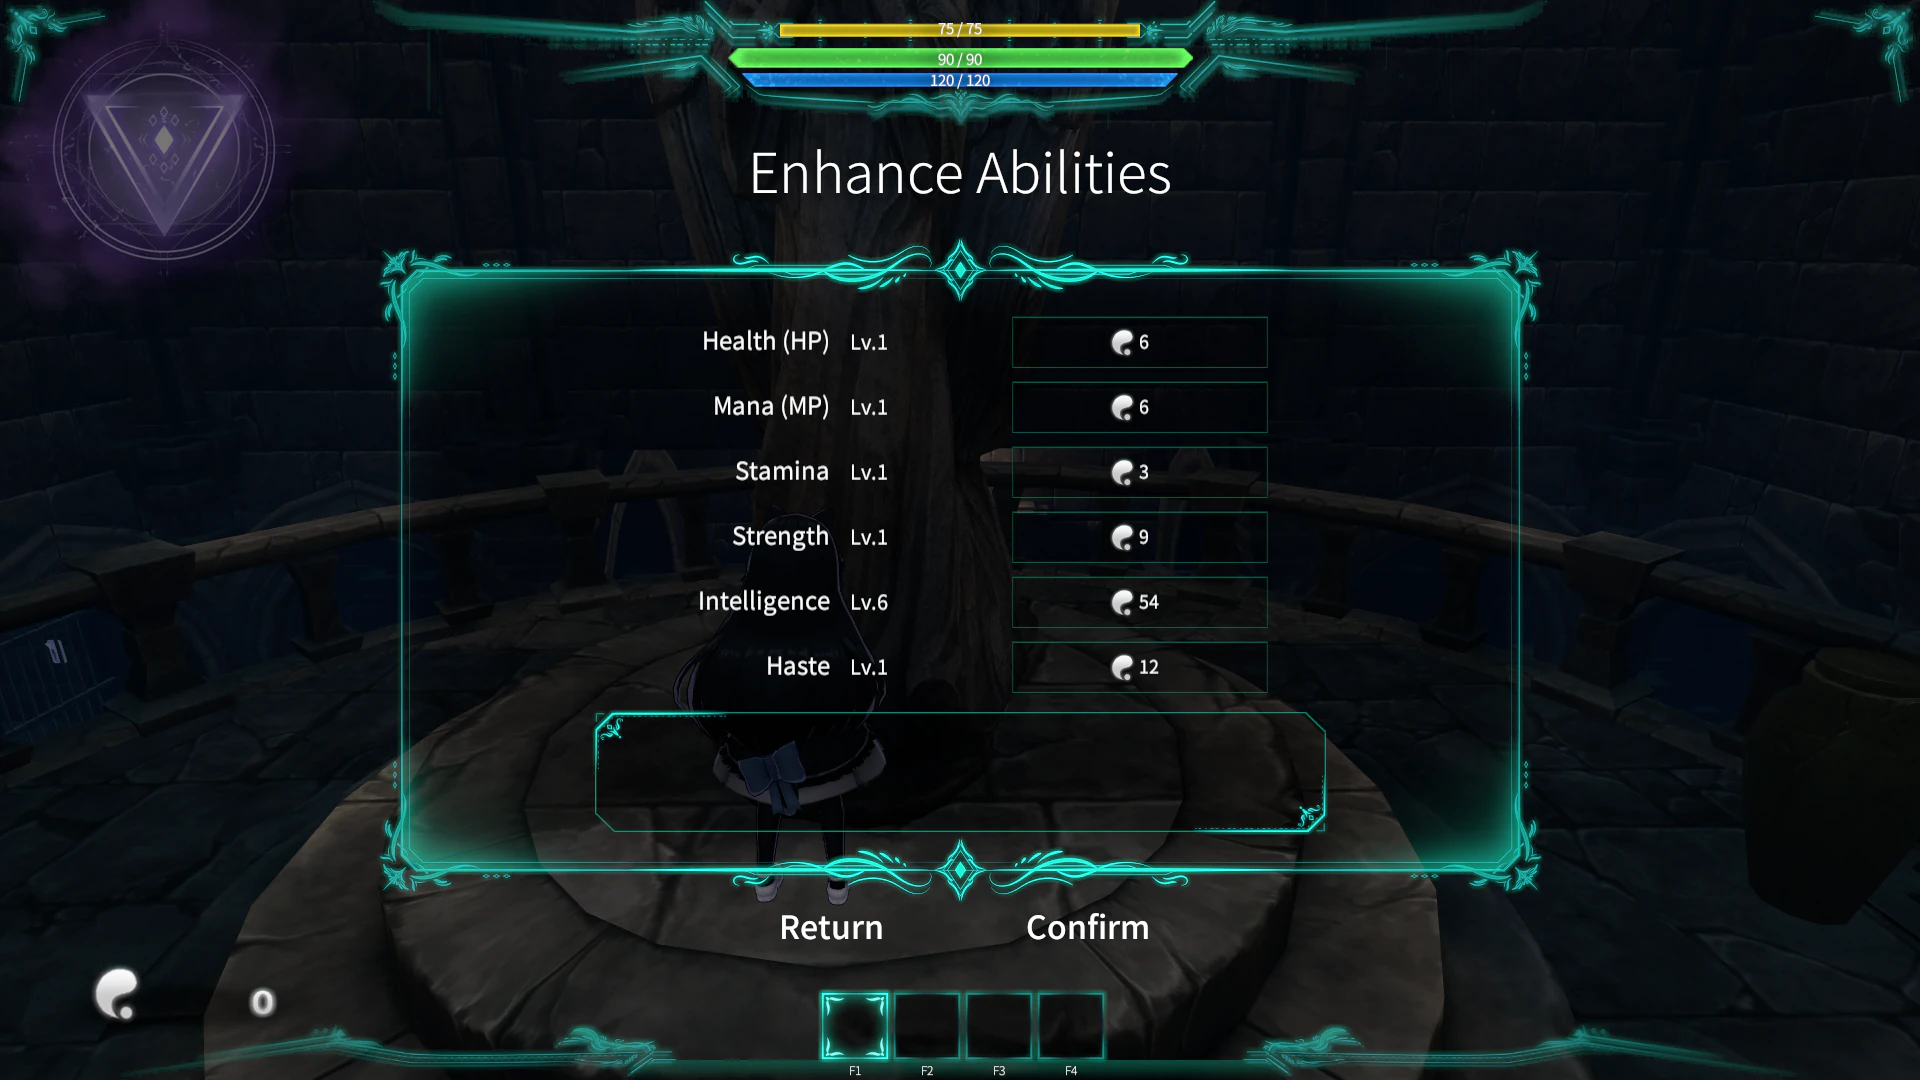
Stats before leaving the statue
Jump directly over the fence in front, then take either left or right at the circular corridor. Stick to the inner wall to optimize your trajectory. Trigger the cutscene. Skip it. Run backward (or turn around), jump and hit the mana crystal twice, jump again and hit it only once. Start charging Ice magic while walking towards the flames. Start running again when reaching max stamina. Try to save as much stamina as possible while going up the stairs. Break the stone crystal by using a triple melee attack combo on the ground. Skip the cutscene.
Tip
A small time save was found in this room to climb to the crystal by jumping through the room instead of going up the stairs. It saves a few seconds but will require you to manage your stamina more precisely to do the barrier skip just after. Here is a video example of it
Wait to reach around 80% stamina, then jump on the pedestal, double jump, and use a jump extension to reach the platform in front. Continue in a straight line until the stairs. Here you have two choices: either kill the enemies downstairs to disable the magic barrier or try the barrier skip. I will only explain the barrier skip here.
For the barrier skip, you will need to jump onto the arches on the sides (left or right, there's no difference). What I like to do is jump directly over the corner stone support half down the stairs and then jump onto the right arch. Then I double jump of the arch followed by the two aerial attacks directly, all this while moving a bit on the left without moving the camera.
This skip is a question of feeling. Try out different things and stick to the one that is the easiest for you. No method is better than the other.
After skipping the cutscene, head to Tania by going in a straight line in front of you (you can jump on the fence) and then on the right, ideally taking this chance to kill the enemy on the ground. Jump down and trigger the cutscene to start the fight against Tania.
Tania
This boss fight is heavily rigged by RNG. Depending on which pattern she does, you may lose up to 20 seconds.
The goal of this fight is just to do as much damage as possible by using charged Ice attacks. For this, you will need to learn how to parry most of her attacks, or at least to dodge them. There are also a few jars on the right wall that contains some mana orbs. You can destroy them when Tania isn't attacking and you are low on mana. Most patterns will give you a fully charged Ice attack directly if you parry them meanwhile two of them can give you two charged Ice attacks.
The first of these two patterns is the one where Tania throws three punches and then slams on the ground. Parry the first or second punch to charge one attack, and then parry the slam on the ground to get a second charged Ice attack. The second pattern that can give two charged Ice attacks is the one she uses when entering her second phase. She will first charge an attack that will hit in a big aoe around her, which you can parry to get one charged attack, and then three blue projectiles will spawn. Countering or destroying these orbs using non-charged Ice magic will give enough mana to charge another Ice attack. As for the laser attack, I prefer to just dodge in the direction of the laser instead of trying to counter it. If done correctly, it gives a fully charged Ice attack without having to counter.
Always try to hit Tania with non-charged Ice magic between her attacks, especially if your mana bar is full. Unused mana is wasted mana. You don't necessarily have to aim at her head hitbox since it is really small. It's better to hit all of your projectiles in her body than miss a few of them trying to aim at her head. In fact, the damage multiplier for headshots is too small to be worth the required accuracy.
Notes on cancelling the counter animation
It is possible in this game to cancel the end of the counter animation to gain back control of Nobeta a bit faster. While this could be thought as something you should do every time, this is not the case! Especially for this fight. The reason for that is that cancelling the end of the counter animation will also cancel the mana regeneration effect. This means that you will recover less mana if you cancel the end of the counter animation.
Mana being really scarce in this fight, it is worth to wait for the animation to end against Tania. Nonetheless, you will want to cancel the animation against Monica, and the best way to do this is to do a "backward dodge", meaning that you have to dodge without pressing any direction input. This way the dodge animation will be faster (just a small back hop instead of a full roll).
At the end of the fight, wait for the cutscene, skip it, and then run directly towards the door in a straight line as fast as possible, without letting the time for the souls to reach you. Note that you cannot interact with the door while running. This means that you will need to cancel the running state when reaching the door. You may ask why it is so important to reach the door as fast as possible. This is because we're exploiting a bug in the game that makes all souls obtained during a loading screen count twice their value when playing in Advanced (no change in Standard as far as I know). If done correctly, you should have around 900 souls at the start of Lava Ruins. This souls duplication glitch is considered a major glitch and it is against the rules to do it on purpose in this category, but since you can't really avoid doing the glitch in this room if you just run straight to the door, it is allowed for this specific part.
Lava Ruins
Lava Ruins is probably the hardest level in this run because any death before Monica will take you back to the beginning and falling in the lava means instant death. This is also the first level where we start killing enemies.
Fire Magic
The first thing to do is to get Fire magic, but before that we need to upgrade our stats. At the start of Lava Ruins, move forward to trigger the first cutscene, skip it and then Pray to the statue. Here you need to take at least Strength 3, Stamina 5, and Intelligence 14 the rest is up to your preferences. I usually take a bit of mana (lvl.4) and more stamina (lvl. 7).

Example stats before leaving the first Lava Ruins statue
After leaving the statue, run straight forward to the stairs and then turn to the right. You are going to enter what I call the cross intersection. There are two different ways to pass this room.
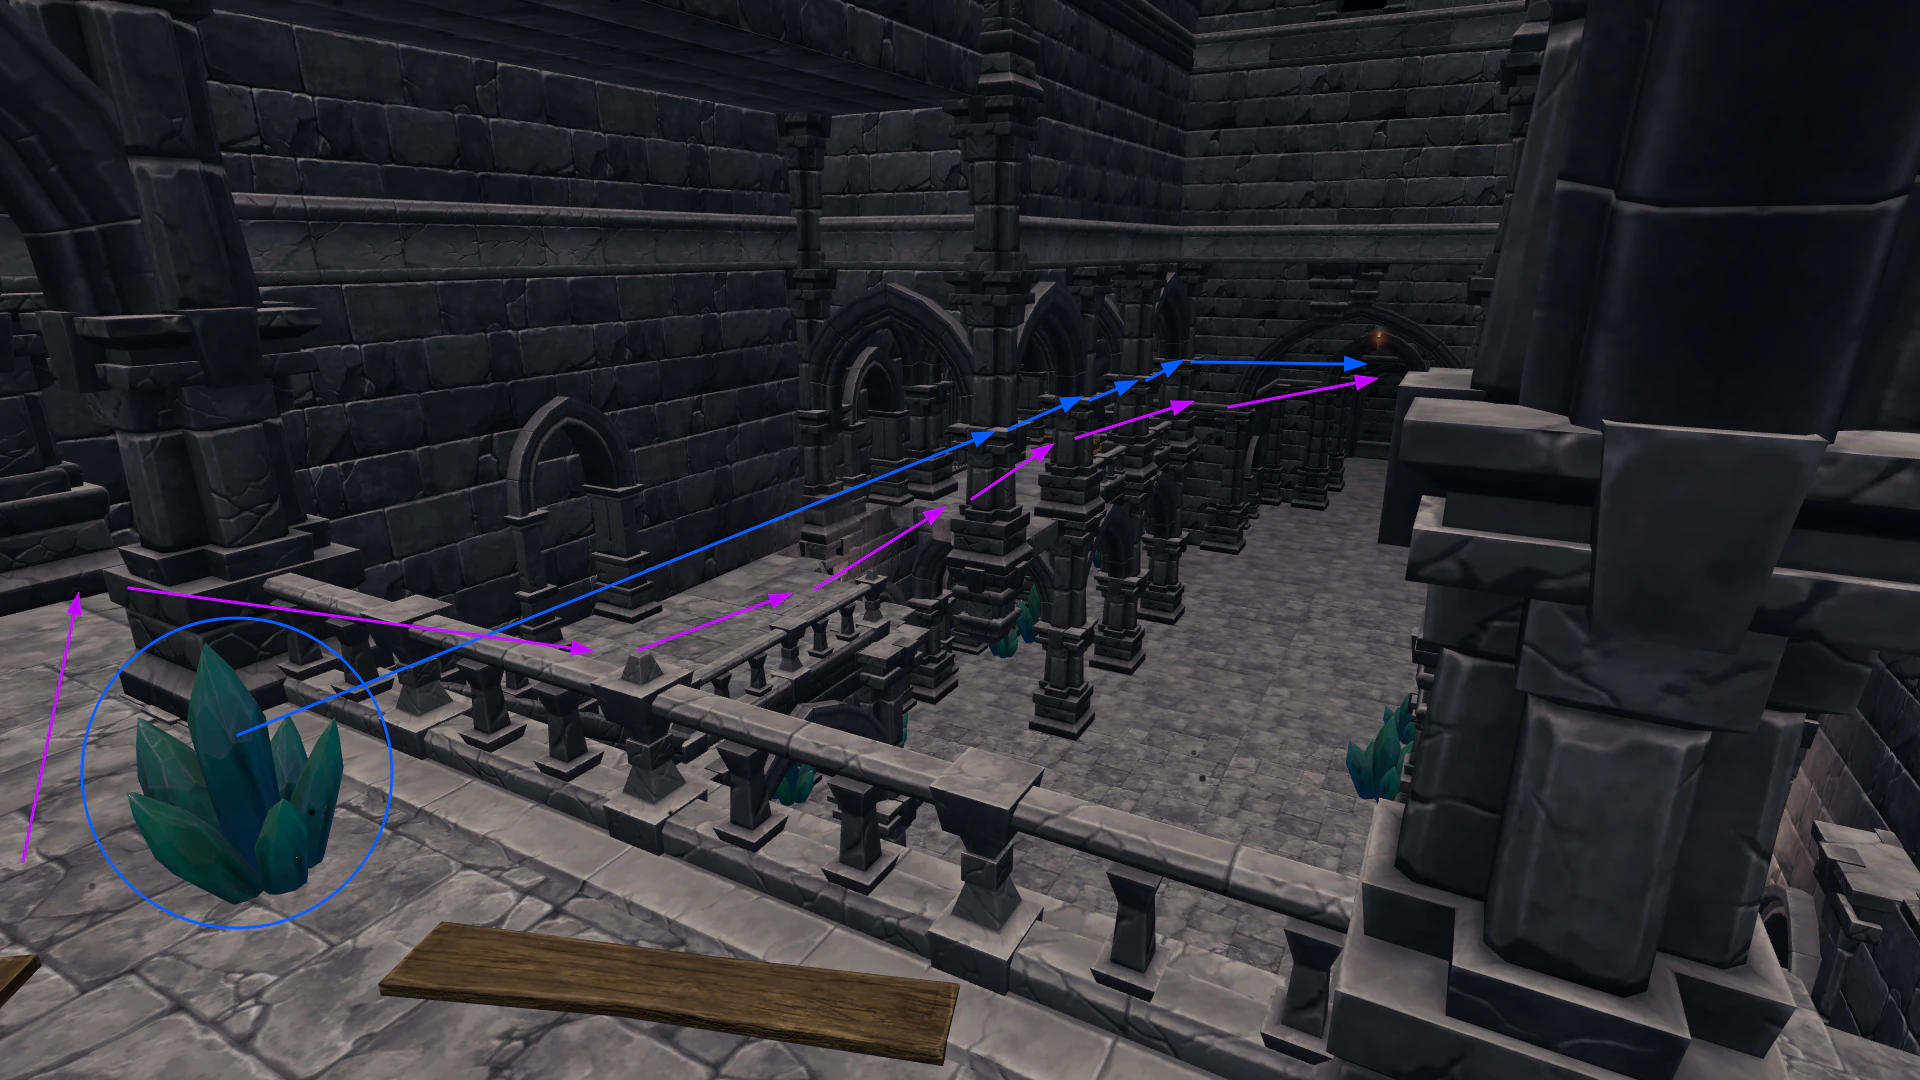
The first method is to kill the first enemy in front of you while going down the stairs (the one circled in blue on the left), shooting once at the enemy on the far right (the one circled in blue on the right) to get his aggro and then jumping on the platforms at the center to reach the room on the right directly. This is the easiest setup because it nullifies the chances of an enemy staggering you and making you fall during the jumps. This path is drawn on the image below in blue.
The second method is to jump onto the rocks wall on the right by doing a double jump extension with an added aerial melee attack before or after the second jump. Then once you reach the correct position against the wall you will be able to climb towards a pillar to then jump to the room on the right. This can be quite hard to do since there is no obvious visual guide on where to land on the wall and missing the jump extension leads to falling into the lava. This path is drawn on the image below in purple.
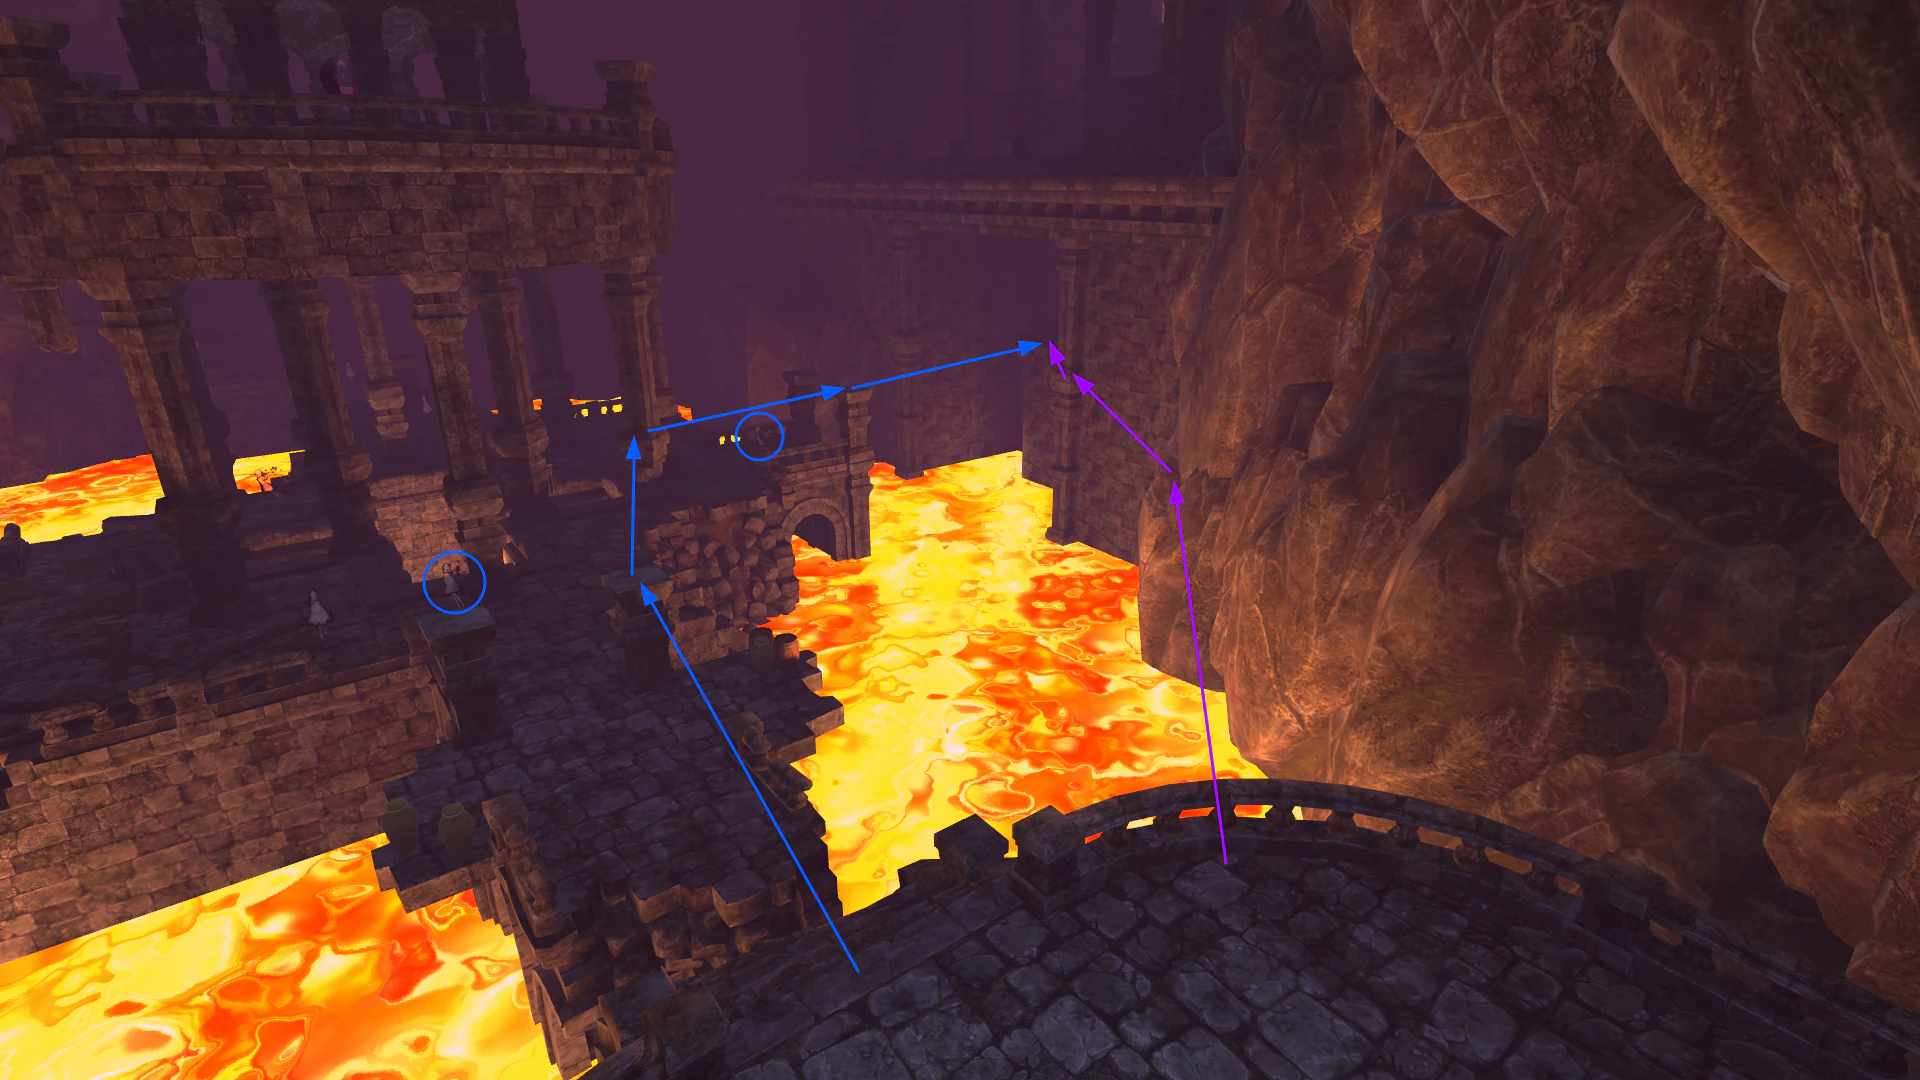
Cross intersection room with both possible paths shown
When entering the next room, climb up the first stairs and kill the flying enemy then continue to go upstairs while breaking the two jars on the right. Destroy the wood floor by shooting Ice magic projectiles at it, start charging Arcane and fall down (do an aerial melee attack just before touching the ground to avoid the recovery animation). A big doll will spawn, shoot charged Arcane magic twice at it since you should have Arcane lvl.2 at this point, charge another one Arcane by using melee attacks against the big doll. Use it against the doll and then finish her off using non-charged Arcane or Ice magic. Wait for the barrier to disappear, follow the corridor (the one without a stone crystal), then go to the right at the next intersection and continue forward until you trigger the next cutscene. Skip it.
Important
Arcane 2 skip: This is another tricky path if going for the Arcane 2 skip route. The issue there is that killing the big doll after this section requires a lot of mana if using Ice instead of Arcane. To compensate for that, the best is to break the two barrels just to the right of the first blue arrow in the cross intersection room schema. Then when going down to the doll the best is to "trick" the boss by landing on top of an arch to avoid her moving or attacking. This makes it perfect to cast charged ice magic and make sure she's taking all the damage of it (she usually dodges the projectiles if not using this trick). Then you can confirm the kill by just shooting normal ice attacks at her head. Here is a video example of the full section
Now we're going to get Fire magic. Follow the path on the left and kill the doll on the ground that is waking up using non-charged Ice magic. Break the two jars on the right and start charging Ice magic. Hit the doll you just killed using two or three melee attacks to charge faster. Go down the stairs towards the Fire magic book chest while trying to lock onto the flying enemy and the two enemies around the blue mana crystal. Kill any of them using non-charged Ice magic if you couldn't lock onto them. Go to the chest, open it, pickup Fire magic. Turn around, kill the enemy that just appeared in front of you using non-charged Ice magic. Swap to Fire magic, hit the big mana crystal twice using aerial melee attacks, go to the right up the stairs and start charging Fire magic. Lock onto the enemy in front of you and then trigger the magic barrier by walking to the left and start recovering your stamina while walking towards the stone crystal that is going to appear. Bait the big enemy attack and then run towards the stone crystal to destroy it using aerial Fire melee attacks. Shoot the charged Fire attack directly after destroying the crystal, killing the big enemy behind you.
Note
There is a new method to do this room which is a bit faster and exploit the fact that the collider to trigger the magic barrier goes below the floor and is thus accessible from below. Here is a video example of it. This is a bit more complex than going the usual path but it does save a lot of time so it is the recommend route if you're trying to be the fastest possible.
Bear Start
This part that leads to the "crystal ride" is quite straightforward: take the first path to the left after the room where you just destroyed the stone crystal, jump to the right onto the platform then go right, kill the two enemies there while recovering your stamina (~60%), jump on the left while dodging the maid doll attack (try to be as much on the right as possible to dodge her attack), shoot the enemy directly on the ground on your right using Fire magic, jump over the small pit, kill the enemy that is waking up and then follow the path to the big blue mana crystal which I call the crystal ride.
Again, there are a lot of ways to do this part. I am going to explain the one I use, this is the fastest but hardest method. I will link a video example below of the other method that is a bit easier.
Start by activated the crystal ride, charge Ice and use two times two aerial melee attacks against the crystal. Lock onto the first two enemies, cast and charge Ice again using four aerial melee attacks just as before. Lock onto the only enemy on the left, cast and repeat charging Ice another time with four aerial melee attacks. Finally, lock onto the last two enemies, charge Ice and start running directly when you reach 100% stamina in the direction of the crystal ride. The timing of this part will always be right if you followed the previous instructions, there is no need to wait. Do a double jump extension and land onto the stone ledge on the left using the momentum the crystal ride gave you. Make sure to reposition yourself on the ledge and then jump to the next one. Jump onto the third one. Jump on the platform on the right while locking the flying enemy, then jump again and lock onto the second enemy next to you. Go around the ledge on the right and jump to the last one. Jump towards the end of the crystal ride and cast the Ice magic whenever you are above land. Shoot at the enemy on the left while recovering a bit of stamina (~60%). Follow the path upstairs until the next stairs. Break the jar on the left containing a mana Meager Magic Crystal then Pray to the statue. You've done the hardest part of Lava Ruins!
At this statue you want to take at least 2 or 3 purple crystals and if you have enough souls go for Intelligence 16. After leaving the statue, jump over the lava to the right and follow the path. Shoot as early as possible at the big doll using non-charged Ice magic to make her start an attack. In most cases you will be able to dodge her attack by just running past her, otherwise you will have to dodge. Climb up the stairs and trigger the cutscene to the next boss. Skip the cutscene.
Tip
There is a new way to pass past the doll that is both easier and faster. Instead of taking the doll aggro by shooting Ice at her, cut the corners and shoot one Arcane projectile behind her to make her turn around, then just pass past her before she turns back. You can see a clip of it here (Thanks to Muki for finding and sharing this).
Bear
This boss fight is similar to Tania, parry as many attacks as possible to use more charged Ice attacks. Use non-charged Ice attacks whenever possible between the Bear attacks. A lot of patterns allow to cast two charged Ice attacks and the Bear tends to attack more so this fight is way less random than the one against Tania.
One thing to note is that you need to be close to the Bear when he does the attack where he charges one ground projectile per hand and throw them at you. If you're not close to him during this attack, you will get way less mana from the counter. It is also possible to counter the attack where the Bear slams the ground and make you fall if you are in melee range. This is because the "shockwave" can't be parried since it doesn't do damage but the slam with his hands in itself deals damage.
Knowing when to charge and when to shoot directly is key to optimizing this fight. Note that when you will want to charge again after a charged attack, you will need to wait a small delay and the charge input cannot be buffered so it can be missed. To avoid this, always shoot once with a non-charged attack and then charge, this way the charge input will always correctly register. You may also drop a purple crystal on the ground to recover more mana, allowing you to shoot more non-charged attacks if you tend to be low on mana during the fight.
Tip
It is not possible to counter while taking damage, this means that you will need to get out of any lingering fire on the ground before being able to counter any attack.
Monica
This fight has the particularity of being always the same in the sense that Monica will always do the same attacks in the same order. The only thing that can happen is that if you do not do enough damage after the first cycle, she will repeat the same cycle instead of doing the second one, which usually should not happen once you know how to damage her efficiently. If done correctly, Monica should always die when exploding the second sphere she charges.
The main point of this fight is to burn through your mana as much as possible since countering any of Monica's attack will recover a lot of mana. You can use either Fire or Ice magic (always in the head) to achieve this, I personally prefer to use Fire since it is either to be consistent with it (you can count the number of non-charged attacks you have to do). Always charge an attack before countering and use non-charged attacks between Monica's attack.
So how is it possible to save time in this fight since she should always die at the same attack and the fight has no rng? It will depend on how long you wait before exploding her two charged spheres, indeed, the damage increases the more you wait. One thing to know is that the second sphere is charging way faster than the first one, so you should always wait for the second one to be fully charged, which will deal 3600 damage. I always try to wait for at least 2000 damage on the first sphere, which should be enough to kill her on the second one directly if the rest of the fight is done correctly. This number will depend on how you do the fight, it may be more or less, find a value you are confortable with.
Here is a rundown of how I do this fight know that you know the mechanics behind it.
Start of the fight:
- Drop a purple crystal on the ground directly after the cutscene
- Charge a Fire attack using a purple crystal, use a second purple crystal before shooting
- Shoot the charged Fire attack in the lava, this will hit Monica
- Charge a second Fire attack with the mana orbs from the previous purple crystal
- Shoot the second charged Fire attack at Monica
First cycle:
- Start spamming non-charged Fire attacks on cd
- Use your mana crystal whenever you can't use Fire anymore
- Charge fire, counter her first attack, cancel by dodging with a back hop
- Continue to shoot at her with non-charged Fire attacks
- Optionally use non-charged Ice attack to squeeze the last remaining bits of mana before her next attack
- Charge Fire, counter, cancel by dashing forward, shoot the charged attack
- Do three non-charged Fire attacks, swap to Ice
- Shoot at the sphere using non-charged Ice attacks with a small delay between each attack, do not hold the shoot button.
- Adjust the delay to get the amount of damage you want (I try to get at least 2000 damage here)
Second cycle:
- Charge Fire, shoot it at her legs (her body is immune during the recovering animation!)
- Shoot three times non-charged Fire attacks
- Bait her attack by going to the right of the arena
- Start running to the left after she throws the first projectiles while circling backwards
- Charge Fire, shoot it at her
- Move to the back of the arena to be able to counter he next attack consistently (the projectiles may pass above you otherwise if you're too close to Monica)
- Charge Fire, counter the projectiles
- Dash forward to cancel the counter animation and shoot the charged Fire at Monica
Second sphere:
- Shoot non-charged Fire attack, swap to Ice and shoot around 5 projectiles
- Swap back to Fire, shoot one non-charged attack
- Finally swap to Ice again to destroy the sphere, killing Monica
- If Monica is not dead after the sphere explode, use the mana orbs that just spawned to end the fight
Tip
The last part of the fight is using a technique that I named "quick-swapping", it exploits the fact that the game use an independent timer for each magic, meaning that while you are waiting for the Fire cooldown, you can use another magic like Ice. Quick-swapping can be hard to execute and is nearly impossible to do on a controller without using external hardware (Robert_Ordis is using foot pedals for that), so instead you can just shoot non-charged Fire attacks twice and then switch to Ice to break the orb. It is a bit slower but way easier to perform.
After killing Monica, skip the cutscene and follow the path to the teleporter, then follow the cat to Dark Tunnel (if you're fast enough you can pass the cat and run in front of him!).
Dark Tunnel
No more lava! But now, as the name implies, this level is quite dark and it's quite easy to get lost.
Hat Skip/Recovery
Dark Tunnel starts with one of the hardest platforming section in the game, the Hat Skip. I will explain how to perform it but you may want to train this later on, once you get better at the platforming sections. If you don't know yet how to do the Hat Skip, you can use the safe route instead (taking the absorption book is not recommended).
So what about the Hat Skip? Start by triggering the cutscene by going towards the statue and then skip it.
Turn around, start running until you're able to jump onto the first stone pillar at the intersection. From there jump on the scaffolding and then circle around on the left to jump onto the first stone ledge on the wall on the right. Single jump onto the next ledge in front of you.
From this you need to double jump into the stone wall but the movement is really precise and you will be half stuck not done correctly. To land correctly onto the stone wall, you need to land in the center of the wall on the left side. If you jump too far or too much on the right you won't be able to do the next jump directly, you'll first have to "unstuck" Nobeta by moving back a little and then doing double jumps to land on the correct position.
Once you're on the wall and positioned correctly, double jump onto the stone pillar on the right, try to jump and wait a bit before going right directly or you may also get stuck. From there jump onto the non-damaged wall and start recovering your stamina. Stay to the beginning of this wall because you will need to get enough momentum for the next part.
Here you have two choices, the first one is to jump on the stone ledges on the building on the left using a double jump extension. You will need to jump at the last moment to reach the first ledge, the rest is quite easy once you reach the first ledge. The second method is to use the stone ledge in front of you to then jump to the hat directly from there, which is a bit harder but also saves a bit of time (~2 sec). I like to call this second method the Hat Skip Skip to differentiate the two. You can find a video example of each method below.
Tip
There is an even faster method by using a death abuse to skip the cutscene entirely and returning back to the statue just next to the following cutscene. It saves around 1-2 seconds of time and is used in any recent runs. You can see a nearly perfect hat skip segment with it there (Thanks to Muki for finding and sharing this).
Thunder Magic
Tip
This section use multiple techniques to redirect Nobeta's velocity while in the air to optimize the movements. This is explained in details in the Movements Guide video.
Now we need to get Thunder magic. After skipping the hat recovery cutscene, start running but do not jump off the platform because there isn't enough space to build momentum. Instead let yourself fall down and use your second jump while in the air after a bit of time. Go to the cat to trigger a cutscene, skip it.
Run towards the light sphere, interact with it to pick it up, you can cancel the pickup animation by rolling on the right after a small delay when Nobeta's arms are "in a V" and you see light particles spawning. Jump to the left of the stairs, use the aim tech to redirect your velocity towards the next sphere pedestal and do one aerial melee attack before touching the ground to avoid the recovery animation. Aim at it while getting as close to it as possible to destroy it (if you are too far from it, it will take more time to destroy the sphere).
Turn around and start running by following the path on the left. Jump down using a single jump extension and passing below the arch. Use your second jump after passing the arch to redirect your velocity towards the stairs. Go below the platform to the left and follow the path until you find another set of stairs. Jump from there to reach the next stairs in front and then Pray to the statue on the left.
At this statue, take 5 purple crystals and use the rest of your souls to upgrade Intelligence. Turn around and go back to where you came. Instead of going down the stairs, jump on the left, aim while in the air to redirect you velocity, and then redirect another time using the second jump, doing in total a smooth 180°.
Now you need to climb up to get Thunder, there are two possibilities. Either jump on the platform and follow the stairs until you reach the top to then jump towards thunder. Or, jump on the stairs and then reach the stone ledge in front from there, jump on the right on the small arch and then jump on the platform where the chest containing Thunder is. This second method is way harder to perform and is a minimal time save (~1.2 sec), only use it if you feel confident enough. After picking Thunder, open the pause menu and Return to Statue.
Dawnruin Castle
Now that we have Thunder magic, the next step is to reach Dawnruin castle. After the loading screen, roll to stand up directly and follow the path until you reach the stairs. From there, use a purple crystal, shoot at the stone barrier crystal directly in front of you, then charge Thunder. Go down the stairs, aim your charged Thunder attack at the stone crystal on the right and then move towards the third stone crystal on the left. Jump, do two aerial melee attacks and then cast your charged Thunder.
Tip
Mian found a more optimal way to do this thunder trial room by destroying two crystals using normal thunder attacks and the last one using either thunder or fire. There are a lot of different variations for this one, try it out and adapt it to your own preferences! You can still check the video example of it
While still in the air, prepare to run towards the next section. Continue past the big blue mana crystal by going on the left to dodge the sniper shot aimed at you. Stop running when you reach the crystal and then kill the blue enemy that just shot at you using a non-charged Thunder attack at his head (you may not have enough damage to kill him if you miss the headshot). Continue walking and pay attention to which enemy sniper targets you next, the first one to target you is the first one that will go out of his hiding spot. Prepare to headshot the first sniper that will show up, kill him and then start running again to the right while dodging the other shot. Jump on the left of the corner stone ledge of the platform on the right and then jump towards the next part from there using a double jump extension.
Note
Missing any enemy here is not a run killer but you will have to learn how to kill Nonota without Intelligence 22 if you miss too many enemies.
Continue to run until the stairs, from there you can jump onto an arch on the right to climb the next stairs faster. Go up the stairs until you're close to the top, turn around and jump on the platform in front. Walk to recover some stamina. During this time, you can kill the sniper in front of you, continue to walk a bit and then kill another sniper on the right (he will do repeated movements from left to right in the same spot). When you have recovered your stamina, go back to running towards the last part. Jump over the trap pressure plate after the circular room, and continue upstairs. If a sniper aims at you there, sidestep to dodge. Try to optimize your stamina to reach the cutscene before running out of it, bonus point if you can trigger the cutscene using the trip animation.
Tip
There is an alternative path instead of climbing the stairs on the right by using a ledge in front to directly jump up. It is a bit risky and saves only around a second and a half. Melon is known for being quite good at it with optimal stamina usage, here is a video example of him doing it
Skip the triple cutscene.
Vanessa Start
After the cutscenes, run past the statue, go up the stairs and follow the corridor on the left. Run until you're in melee range of the first sniper in the room, headshot him. Run towards the stairs on the right, shoot the sniper on the right while running and stop at the stair landing. Go up the stairs while walking to recover your stamina, then jump to the left after reaching around 70% of stamina. Run towards the next stairs go up while sidestepping to dodge the different attacks that may come to you. Run towards Vanessa to trigger a cutscene.
Tip
An alternative path for the castle part to Vanessa is to just skip the enemies if you don't need the souls. That works perfectly if you can manage Nonota with lower Intelligence stats. You can see the full section there
Vanessa
To perform the optimal strategy of this fight, you will need to learn how to recognize when Vanessa stops dashing and is going to attack. This fight is quite easy and has no randomness if you know how to recognize this pattern. The fight goes as follow:
- Shoot once at her using a non-charged Thunder attack to cancel her jump
- Swap to Ice, break all the jars on the left side as fast as possible
- Charge Thunder, cast it at Vanessa once directly as she should be already attacking
- Go away from her, break the jars on the right side
- Charge Thunder, cast it at her again and make sure not stay too close to her
- Use a purple crystal, charge Thunder and use another purple crystal
- Wait for her to stop dashing, cast Thunder at her, charge and cast another Thunder
- Get away from her and repeat: purple, charge, purple, cast, charge, cast
Even if it seems difficult at first, you can always cast thunder just before she's attacking if you're fast enough, even when she's doing the spin attack which is her fastest attack. Here is a good example of doing it.
Warning
At this point in the game, you can still self damage yourself with Thunder so make sure to always get out of the Thunder area of effet before casting hit.
Skip the cutscene after killing Vanessa to go to the next level, Spirit Realm.
Spirit Realm
Spirit Realm is probably the longest level of the game, it contains a lot of platforming sections and two bosses (Seal and Vanessa 2).
The platforming sections have been optimized a lot and it may not be wise to directly try using the best routes available. I will in this guide describe the route used in the current world record (as of 2024/08/14) and link a few new experimental routes at the end.
Seal Start
Start by skipping the first cutscene.
Follow the path to the right of the statue until you get close to the middle of the next area with enemies. Stop running to recover a bit of stamina (~70%) and kill the farthest enemy in the middle behind the barrel. Climb on the arches by either jumping on the crystal on the right (c.f. blue path in the image below) or by jumping on the barrel (c.f. purple path in the image below). Jump towards the next stairs and go upstairs while breaking the crystals. Break the crystals at the top of the stairs and charge Thunder using all the mana orbs that spawned. Then go either left to climb normally or use the crystal directly on the left to jump on the ledges on the right wall. Make sure to not get hit by the purple archer enemy.
Tip
It is also possible to reach the stairs in one go without having to regenerate stamina by following one of the two new path in orange. Both of them only require two double jumps so the stamina usage is the same, use the one that you prefer.
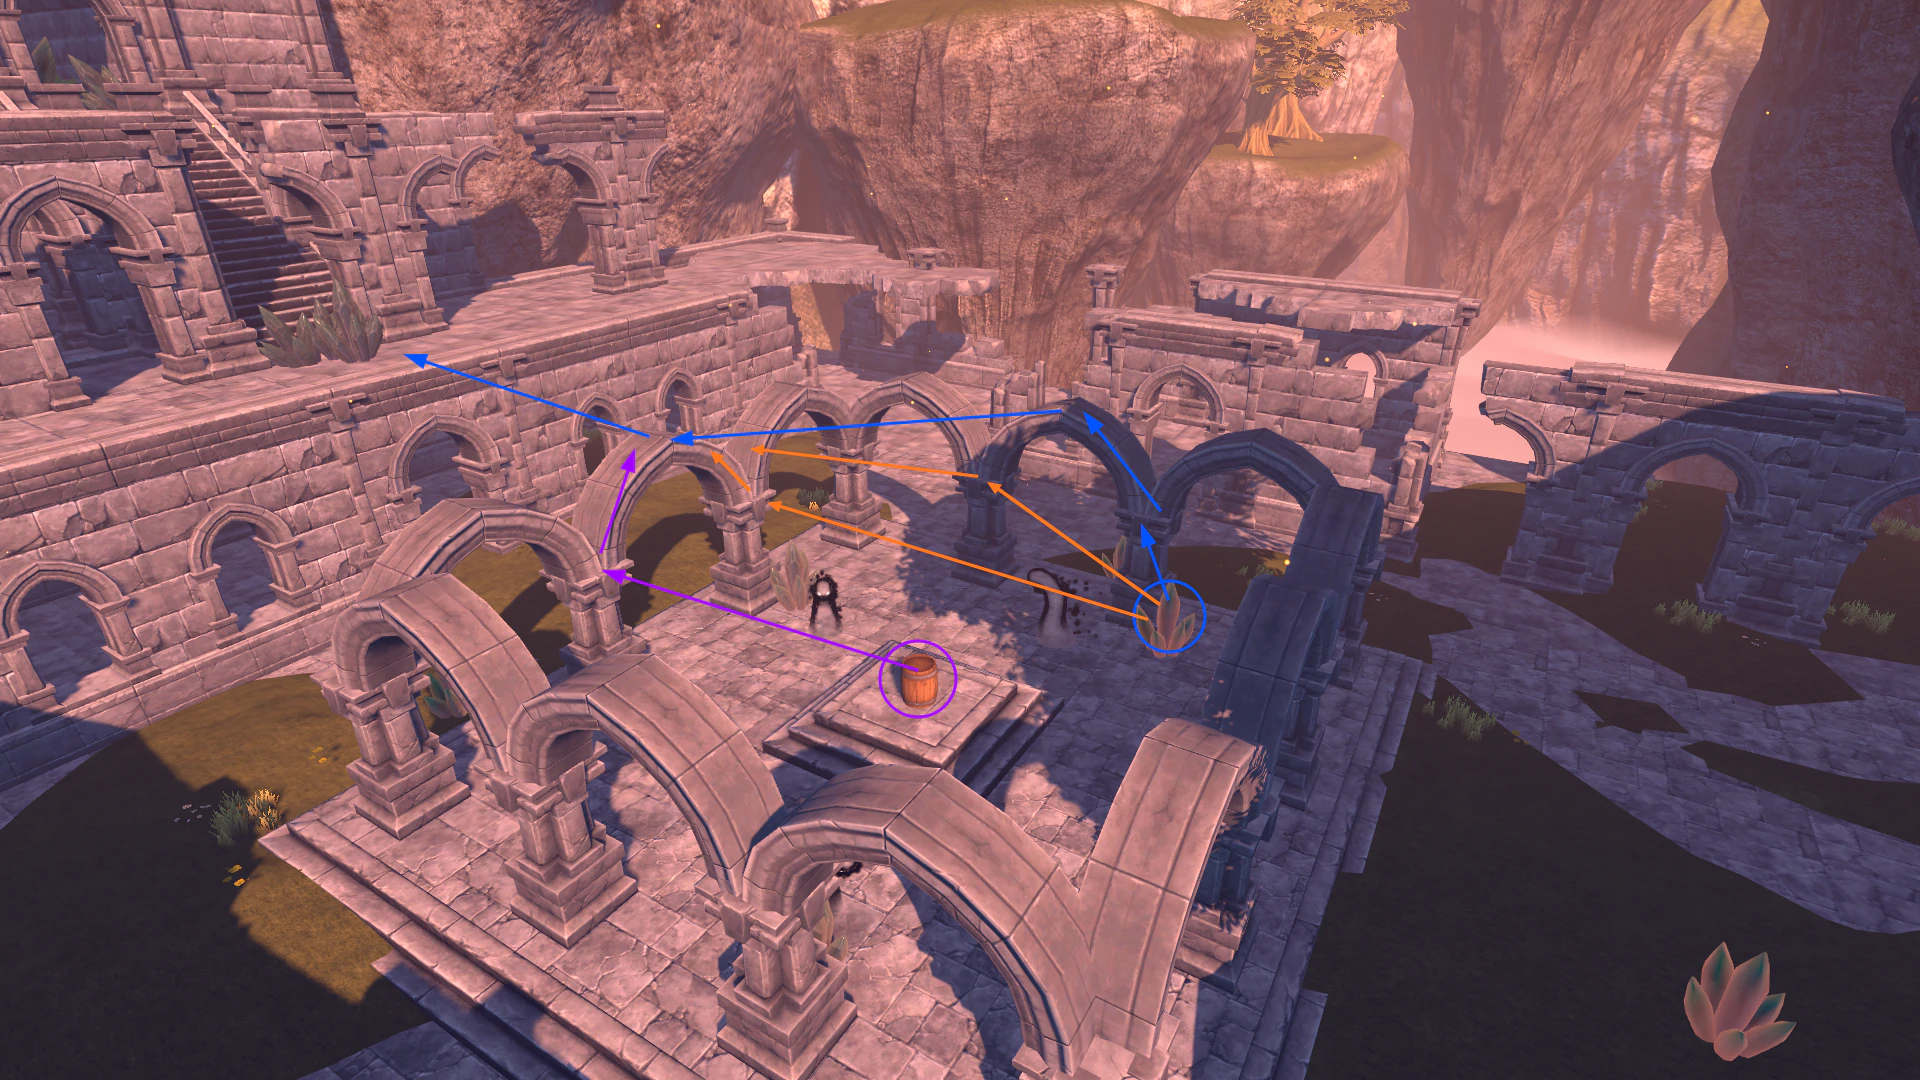
Possible paths to climb the arches. Start on top of the crystal for the blue and orange paths or on top of the barrel for the purple path.
When at the top, cast thunder in the pack of crystals and recover your stamina. When full on stamina, jump onto the crystal in front of you. From there, jump towards the side of the small floating island and then climb the side until you reach the top. From there, you want to jump onto the stone fence on your right, then on one of the two pillars (you can use an aerial melee attack to make this jump easier), and from there reach the platform with the two crystals. Get on top of the crystals and jump to the right. Recover your stamina completely and then follow the stairs upward, climb on the crystal directly on your left, and get onto the last platform on your left from there. Finally, follow the stairs path until you reach the statue, make sure to dodge the enemies that dash at you by sidestepping or simply kill them, otherwise they may cancel you when trying to Pray to the statue. This section can be a bit confusing so refer to the video example.
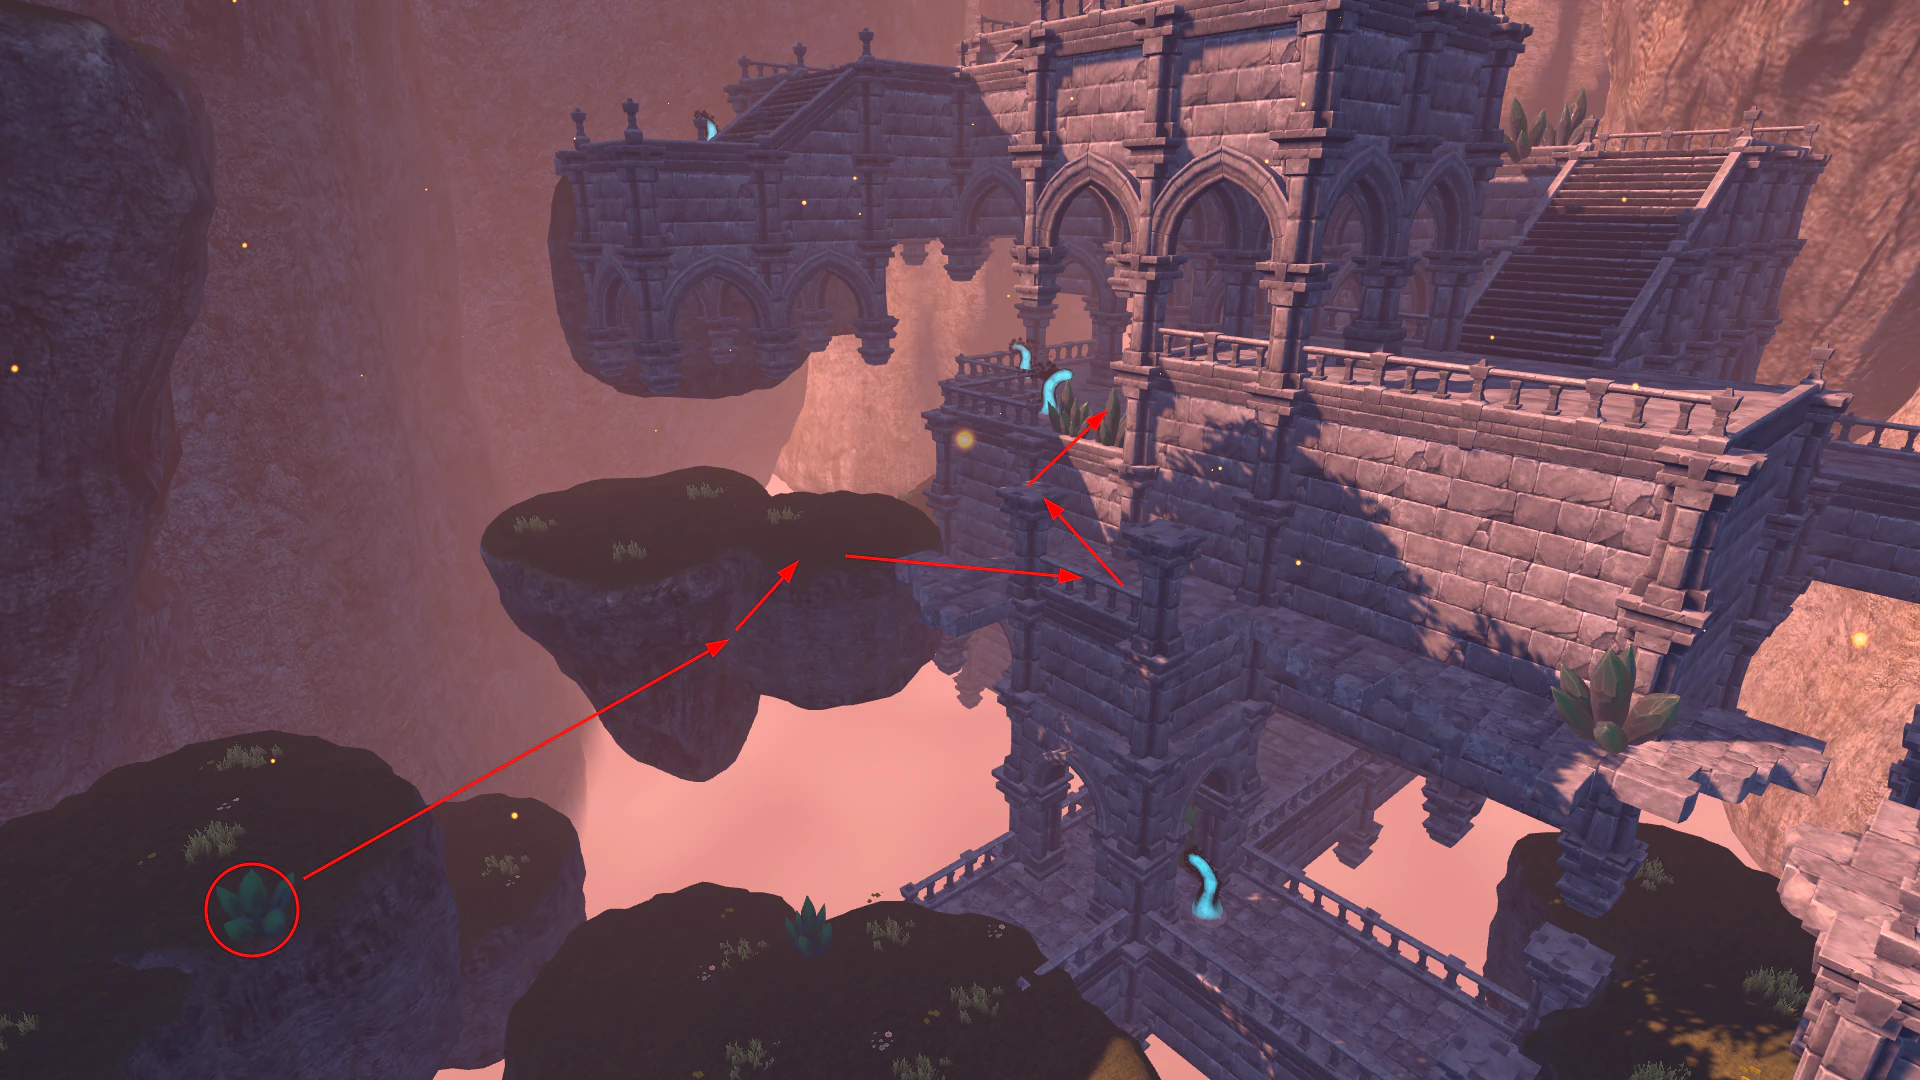
Path to seal statue, start on top of the crystal
Tip
There is enough mana to fully charge a Thunder attack before this section which allows you to make Nobeta go faster. This of course makes those already hard jumps even more trickier but it saves a decent amount of time (especially since you regenerate stamina faster under charged Thunder effect). Here is a video example of the full section with charged Thunder and upcoming Arcane jump trick
Fill your inventory with purple crystals and use the rest of your souls to upgrade the Intelligence stat. The fight against Seal 1 and 2 varies a bit depending on your Intelligence level but there are no strict requirements. Leave the statue, run and jump over the fence while heading to the right. Use a double jump extension to reach a ledge on the right side of the wall in front. Single jump onto the next ledge and then reach the top of two arches using a double jump extension (there is an invisible collider there that you can walk onto). From the second arch, climb on the small floating island. Go to the left and destroy the breakable wall, then follow the path of this wall to get to your second Thunder book.
Tip
There is a faster way to reach the Thunder magic chest by using an Arcane magic cast to extend your jump and reach the top directly from the statue. The NMG rules have been adjusted to allow for those types of tricks so feel free to try it out even in this category! Here is a video example of it
Recover your stamina and prepare to jump on the left of the stairs next to the chest. With at least 50% stamina, jump along the wall and start doing a single jump extension (keep your second jump). There is an invisible wall to get past, it extends past the small floating island on the right. When past the invisible wall, use your second jump to redirect your jump to the right and pass below the arch in front. Jump again to reach the last corner ledge of the building in front. Do a double jump extension to reach the Seal fight arena. Again, this section can be quite confusing so refer to the video example. Trigger the cutscene, skip it.
Seal 1
No need to keep it a secret, the first Seal fight can be the most difficult, annoying, and frustrating fight. The only way to make this fight easy (but slow) is to play on a quite old version of the game but this is not the one recommended in this guide (c.f. Game Versions). I will explain below how to do the fastest but hardest method to kill this boss. I do not recommend it for new runners as it is a strategy that can kill a run quite easily as it is the opposite of safe. You may prefer to find your own strategy for this boss and apply it until you feel ready to use the one detailed below, as of writing this, I am still the only runner to perform this regularly in a run, and I often half-fail it, losing up to 20 seconds.
Before explaining the exact strategy in detail, let's explain how this fight work, knowledge that is good to know for any strategy. Those notes are taken from an analysis of the fight that was made on the speedrun discord, use the map below to visualize the arena.
She (the Seal) will act in three distinct phases in this specific order (hover, force distance, land) if she's never canceled:
- She will hover for some seconds, she often move a bit in this phase but she will never land directly, so the first "aerial dash" is always an hover and she will always land to a different spot, this is kind of a "fake landing"
- If you keep following her while she hover she will try to make you escape by doing a close range attack without the need to be on a landing spot
- If you let her hover and keep some distance with her, two different things can happen (4 or 5):
- If you're far from her, she will almost always land to a spot near Nobeta and do one of her three different close range attacks (forward dash, swipes or downward slam).
- Otherwise, if you're close she will almost always land to a spot far from you and do one of her three different range attacks (explosive balls, beams from ground or repulsive wall)
- If she gets cancelled when she is doing her attack or casting it, she will most likely skip her hovering phase and attack again directly
There is a total of 498 mana available counting all the crystals in the arena.
It also may be worth to know that:
- Arcane needs 45 mana to get fully charged
- Ice is 60
- Fire is 75
- Lightning is 90
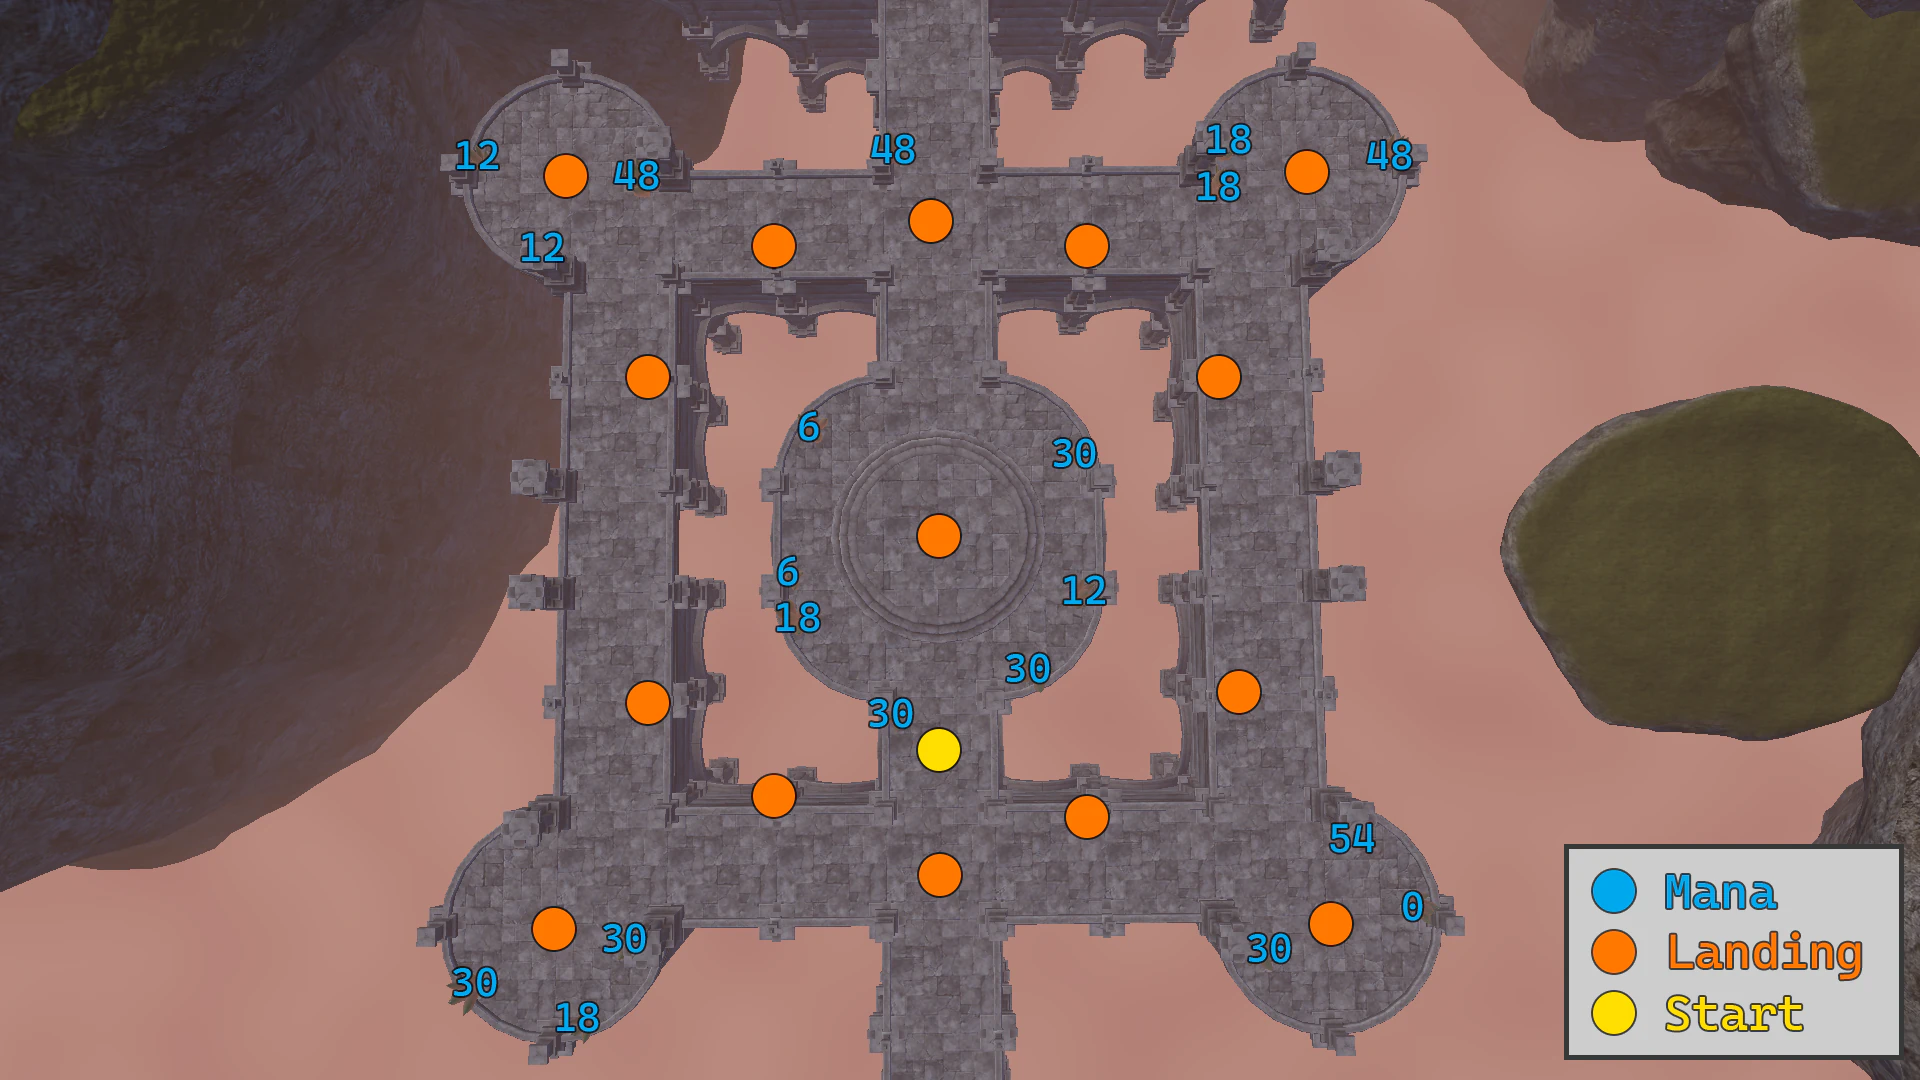
Seal 1 fight arena with all the possible landing points and mana crystals
With all this information, here is how the fight goes optimally.
First Thunder cycle:
- Shoot once at Seal using non-charged Thunder
- Break the first crystal on the left and then the three crystals on the right using non-charged Ice attacks
- Charge Thunder and wait for Seal to land somewhere
- Go in range of her, use a purple and cast the charged Thunder under her to stagger her (use the shadow if it helps you knowing where to cast)
- Charge the second Thunder and wait a bit
- Cast the second Thunder when Seal is starting to recover to stagger her a second time. Casting this Thunder too late will result in Seal not taking the full damage, and casting it too early won't stagger her. You know that your timing is optimal when she gets staggered.
Second Thunder cycle:
- If the double stagger was done correctly, Seal will nearly always charge at you
- Go in any corner of the arena away from Seal that has enough mana to charge a Thunder (all except the top-left corner)
- Shoot a non-charged Thunder attack at her while going to the corner
- Destroy the crystals in the corner, charge Thunder
- Wait for Seal to land, go in range of her, use a purple and cast the charged Thunder under her to stagger her
- Charge the second Thunder and wait a bit
- Cast the second Thunder when Seal is starting to recover to stagger her a second time
Last Thunder cycle:
- Go in another corner of the arena away from Seal that has enough mana to charge a Thunder (all except the top-left corner)
- Shoot a non-charged Thunder attack at her while going to the corner
- Destroy the crystals in the corner, charge Thunder
- Wait for Seal to land, go in range of her, cast the last charged Thunder under her to stagger her
- Use non-charged Thunder and Ice attacks to finish her off if the has some HP remaining
- Before the cutscene starts, destroy as many crystals as possible using non-charged Ice attacks
Tip
Take care of the direction you push Seal in when casting Thunder, you won't be able to hit her if you push her out of the arena since you can only cast Thunder on solid ground.
In this first fight against Seal, she has no "head" hitbox so it's not necessary to aim at her head (you can headshot her in the next fight though!). In addition, her hitbox does not move the same way as her body so it may be hard sometimes to aim at her correctly. From experience, aiming at the lower part of her body is what works the best.
Seal 2
This is another part of the run that is highly technical and that I would never recommend for someone that is starting to learn the run. I would recommend to just kill the Seal using any combination of Arcane and Thunder magic. Not doing what is written below is only a 15 seconds timelose waiting for the barrier to disappear, which is not important until you aim at beating the world record. So, skip to Vanessa 2 Start if you don't feel confident enough for this trick.
At the end of the Seal 1 fight, run towards the stairs and destroy any crystal on your way. At the stairs, cut by jumping to the left directly. Turn your camera around and destroy the two crystals that gives mana on the right side using non-charged Ice attacks. Swap to Thunder, trigger the cutscene, skip the cutscene.
After the cutscene:
- Shoot at Seal using one non-charged Thunder attack
- Charge Thunder, use a purple crystal then cast Thunder it in front of her to optimize the damage
- Turn around during the cast animation, swap to Ice to break the crystal on the far right (it is important to get this mana to make sure you will have enough to kill her)
- Turn back to Seal, hit her with a non-charged Thunder attack
- Charge Thunder, use a purple crystal, cast Thunder in front of her
- Charge Thunder, use your last purple crystal, cast Thunder in front of her again
- Shoot a non-charged Thunder attack, charge Thunder
- Here is the hard part, you need to decide on where to put your charged Thunder attack for an ulterior use. This is mostly done by feeling depending on where the Seal is choosing where to put the charged Thunder.
- Run towards the crystal on the left (c.f. image below), jump on it
- From there, jump onto the next stone pillar on the right
- Single jump onto the last pillar in front
- Single jump to the right of the right ledge
- Do a corner jump to reach the arch on the other side of the wall on your left
- Jump on the arch until you have enough height and you see Nobeta doing the "first jump" animation. If you see the "second jump" animation (the one with the Wind magic circle), do another jump until you get the "first jump" animation. This is important because you will need the second jump to jump over the barrier
- When getting a "first jump", turn around and use your second jump to jump over the barrier
- Cast Thunder directly if you are confident in the position you put it, otherwise land down and look at the Seal to know when to cast Thunder
Seal 2 barrier jump route
Important
You will need to adjust the damage you deal to Seal 2 depending on your Intelligence level. You can adjust your damage by doing more or less non-charged Thunder attacks between the charged attacks or by intentionally casting the charged Thunders off position to deal less damage with them. If running with the new lower Intelligence level 19 route, you need to max out your damage so be careful to cast your charged Thunder attacks correctly!
Vanessa 2 Start
After killing the Seal for a second time, run towards the stairs on the left. Recover your stamina while going up the stairs. At the top of the stairs, turn around, start running to get momentum and then jump over the stone fence on the left. Here you will have to do the longest jump extension in the run. The objective is to land onto the arches far down. This jump extension is explained in details in the Movements Guide video. It is also a good place to train your jump extensions.
Once on the arches, jump towards the platform in front of you. From there climb onto the big crystal and jump onto the floating island using a double jump extension. Recover your stamina. Follow the path, break a few crystals on the way and go up the stairs. Kill the blue floating ball enemy at the top of the last set of stairs, break the crystals nearby and charge Fire. With Fire charged, go as close as possible to the barrier and hit the stone crystal behind it using the first aerial melee attack (the second one does not having enough range, let yourself fall to the ground after the first attack). Do this three times to break the crystal.
Tip
This is another section that got heavily optimized by adding charged Thunder magic time speed effect and by using an additional jump extension from it. The fire charging and path to the crystal were also optimized and contains a new way to break the crystal to make sure the flying enemy dies properly. A video explains it way better than any word could
Skip the cutscene, jump down to the left and take the teleporter. After the teleporter animation, jump onto the ledge of the pillar on the left, then onto the first arch. From there jump onto the next arch in front and then on the land on the left. Follow the path past the chest, break the wall at the top of the stairs and continue until you reach the next statue.
At the statue, fill your inventory with purple crystals, you may skip upgrading Intelligence since you shouldn't have a lot of souls at this point. Go up the stairs and trigger the cutscene for Vanessa 2 fight, skip the cutscene.
Vanessa 2
This fight can be done quite consistently using the strategy described below since the goal is to cancel all of Vanessa attacks, thus not letting any room for RNG.
The fight goes as follow:
- After the cutscene, shoot one non-charged Thunder attack aimed at Vanessa's head
- Use a purple crystal and then wait as much as possible before charging to minimize the time in slow mode
- Charge Thunder, use a second purple crystal
- Cast thunder at Vanessa, charge and cast a second Thunder at her directly
- Shoot a non-charged Thunder attack aimed at her head
- Repeat the same pattern: use a purple, wait, charge Thunder, use a second purple, cast, charge, cast
- Shoot a non-charged Thunder attack at her
- Use your last purple crystal
- Shoot another non-charged Thunder attack at her before charging
- Charge Thunder, cast it at Vanessa
- If she's not dead, shoot a last non-charged Thunder attack
Warning
At this point in the game, you can still self damage yourself with Thunder so make sure to always get out of the Thunder area of effet before casting hit.
Skip the cutscene after killing Vanessa 2, leading to the last level of the game: Abyss.
Tip
There is a new, more consistent, but more complex way to do the Vanessa 2 fight by using correctly timed purple crystals to force the long stagger on Vanessa 2. The key point of this new tech found by Muki is to delay the second charged thunder attack to make sure Vanessa 2 gets staggered for a long time (you can see the difference between long and short stagger by checking at her sword, for the short stagger she's "blocking" the attack by putting her sword in front of her). You can find a video example of it there
Abyss
Path to the trials
This is the last level of this game and thankfully it is quite easy. Take your time to catch your breathe for the last boss fight!
Start by skipping the cutscene after the loading screen. Then pause and return to statue to be teleported directly below to save about a second. Here we need to charge Thunder but we don't have any purple crystal left. To achieve this, it is required to break the non-enemy dolls on the ground and the crystals next to the teleporter. Break them while running towards the crystal, charge Thunder and then enter the teleporter. It is required to charge Thunder here to not get cancelled by the enemies during the teleport animation.
After being teleported into the prison, break the jars on the left and activate the lever. Go into the next room, break the barrel and walk under the light source, this will trigger an alert. You may think that triggering the alert is a bad idea because it will spawn some enemies, which is right, but it also lights up the whole area, making the next platforming section way easier.
Continue to follow the path until you pass past the big enemy with arms and enter the next room (which you may recognize as it is the room where you saved the cat at the beginning of the game). From there you have two different paths to skip the next magic barrier.
The first path is to run along the wall on the left by going down the stairs, jumping overt the small pit and then jumping onto a small ledge on the wall in front of you by going over the stone fence. From this ledge you will need to a 90° jump to get over the barrier (c.f. purple path below). This is the easiest but slowest path.
The second jump uses the small crystal in front to get enough height to reach the stone ledges on the pillars descending from the roof. Jump from one ledge to another using single jumps and then do a double jump extension to jump over the magic barrier from the last ledge (c.f. blue path below). This is easier to execute if you triggered the alert to light up the room.
Possible paths to skip the barrier to escape prison. Here are the video examples for each path:
After jumping over the magic barrier, take the teleporter. Go to the statue in front of you and Pray. As usual, fill your inventory with 5 purples crystals and leave the statue immediately, there is no need to upgrade Intelligence there, we'll do that at the last statue (if going for more than Intelligence 19). The route has been improved (thanks to a trick Muki found) and it is now faster to do the trials for left to right. So go left to reach the first trial.
First Trial (Underground)
For the last trial, start by breaking the wall in front of you using Fire or Thunder, then do a running melee attack to break the jars. Cancel the animation by evading forward and then run towards the rock wall in front. Wait a bit then charge Thunder (if you charge Thunder too early, the wall will take more time to open). You can regenerate a tiny bit of stamina while waiting to avoid having to regenerate some later.
Go down the path when it opens. When reaching the open cave, continue to the left by jumping onto the different platforms. Finally, jump onto a rock pillar in front of the barrier and use the trip animation to pass through the barrier (video example). Evade to stand up faster then take the teleporter and swap to Fire.
After the teleportation animation, shoot at the crystals on the right, get close to them, charge Fire and then break the stone crystal. Skip the cutscene. Go towards the second teleporter on the left by doing a jump extension.
Second Trial (Dawnruin Castle)
For this trial, start by charging Thunder magic by using a purple crystal and rush up the stairs to skip the boulder rolling down the stairs. When the boulder breaks when you get close to it up the stairs, turn around and jump towards the chest containing the next Thunder magic upgrade to get Thunder lvl. 4. From this point on, you have Thunder lvl.4, meaning that you can no longer get hit by your own Thunder.
After getting Thunder lvl.4, go down into the room of the next enemy. Break the crystals on your way to spawn mana orbs and charge Thunder. With Thunder charged, go into the end of the room to spawn the special doll, use a purple, go next to the doll and cast Thunder on yourself. Charge Thunder again and repeat till the doll dies.
Go towards the next teleporter, use it and swap to Fire. Same as before, shoot at the crystals, get close to them, charge Fire and then break the stone crystal. Jump down to the last trial on the left. Use the teleporter.
Third Trial (Lava Ruins)
This trial has gotten really simple thanks to techs found by both me (Eveldee) and Muki. Start by using a purple crystal to charge Thunder. Go directly towards the open room with the lava and fall down into the lava ot the right (without jumping) and use your second jump just before touching it to get as close as possible to the wall in front. If done correctly, you will fall through the lava without taking any damage and skip the need to use the lever to make the lava level go down.
Continue in front of you and then jump down on the left or on the right (depending on your preference, it's a perfectly symmetric room) and cast the charged Thunder magic on the two dolls down below to kill them. If you did the trials from left to right, you should have Thunder lvl. 4 there so you won't be taking any damage even if you cast the charged attack on yourself.
After killing the dolls, run towards the teleporter and use it. Swap to Fire during the animation. When arriving on top of the trial, shoot the crystals on the right while running towards them. Charge Fire when close to the mana orbs and use two aerial melee attacks to destroy the stone crystal. Skip the cutscene.
After skipping the cutscene, a nice trick to save time is to break the crystals on the left while going down, charge Thunder when getting close to the teleporter to Nonota. Since Thunder time slow effect is active, you will have enough time to interact with the statue down below, buy 5 purple crystals (and upgrade Intelligence if not using the Intelligence lvl. 19 route). After buying everything you need, return to the statue and then go to Nonota (video example).
Nonota
For this fight, the objective is to skip the second phase of Nonota entirely. To achieve that, it is needed to stagger Nonota continuously, not letting her the time to enter second phase. There are three different known ways to achieve this, I will explain in details the one that was discovered recently which both the easiest and the fastest method. I will link the other two methods below.
The fight goes as follow:
- Use non-charged Thunder to headshot Nonota
- Charge Thunder
- Dash towards Nonota while evading her first attack
- Use a purple crystal while walking backwards a bit
- Cast your charged Thunder
- Charge Thunder then use another purple crystal
- Aim below Nonota to make her evade in one direction
- Look at the direction she is going and "preshot" her landing point by casting Thunder there
- Nonota should be staggered from the previous charged Thunder attack. Now we will repeat the same pattern until she dies
- Charge Thunder, use a purple, cast Thunder, shoot a non-charged Thunder attack and repeat until she dies
Since this method was not the one used for the world record, you can find a video example of it here.
Tip
It is not necessary to use non-charged Thunder attacks if you're Intelligence level is high enough (lvl. 22) but even if you don't have to, it is faster to do so.
To hit the non-charged Thunder attacks easily, the best it to align yourself with Nonota and push her either towards you or away from you. This way, you won't have to move your camera left or right, only up or down a little bit.
Below are the two other methods to skip the second phase of Nonota. I wouldn't recommend them but if they are easier to perform for you, go for it
Congratulations, this is the end of the run! If I had to something to the guide, it would be: train, train, and train more until you achieve the goals you set yourself, you will get it eventually! May your journey on this game be full of PBs.
Livesplit and record setup
Now that you are ready to start running the game, don't forget to setup Livesplit and a recording software to be able to submit your times on speedrun.com !
It is best to simplify the work of the moderators on speedrun.com to setup Livesplit correctly with the autosplitter to display the Load Removed Time which is the time without counting all the loading screens to make it fair for everyone since loading times vary greatly depending on the hardware your playing on.
There are a lot of guides on how to setup Livesplit but the gist of it is:
- Create the splits and enable the Autosplitter by setting the game title to "Little Witch Nobeta" in the splits edit menu
- Create or use an existing layout which can be personalized to your preferences
A video proof of your run is also required to submit a run on the leaderboard, you can use any software to record your game but I would recommend to use OBS (Open Broadcaster Software®) as it is free, open source and easy to use while being highly customizable if you're a more advanced user.
Credits and Links
Useful links/softwares:
- Nobeta Guides: A page that references a lot of guides, tools and links
- NobetaTrainer: A must-have to train and practice anything!
- Vanessave: A Little Witch Nobeta save and settings editor
- Autosplitter: Auto Splitter for Little Witch Nobeta
- Little Witch Nobeta Speedruns Discord: Community discord with a lot of information, resources and helpful members
- Speedrun.com leaderboard: Official Little Witch Nobeta speedrun leaderboard
A lot of thanks to Shen (@shengon) for helping me to write and proofread the guide while also providing some useful video examples.